In this article I want to add some of the nice features of Bootstrap to Dynamic Data
- Bootstrap Navbar
- Bootstrap Date Picker
Navbar
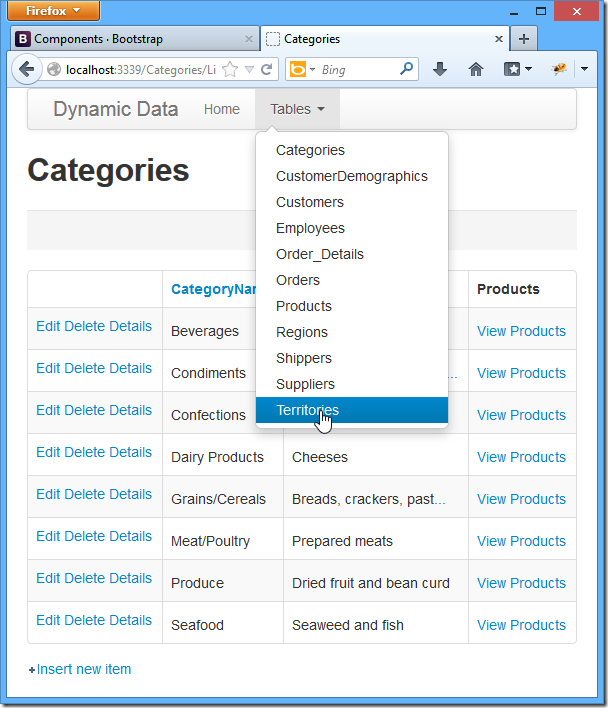
First of all we will move the list of table from the Default Page to the Site.master and have it as a menu in the nave bar.

Figure 1 – the Navbar
All we need for this is to move the Page_Load from the Default.ascx.cs page to the code behind of the Site.master.cs and then add the mark-up the Site.master see the two pages below:
<div class="navbar">
<div class="navbar-inner">
<a class="brand" href="#">Dynamic Data</a>
<ul class="nav">
<li>
<asp:LinkButton ID="LinkButton1" runat="server" PostBackUrl="~/Default.aspx">Home</asp:LinkButton>
</li>
<asp:ListView ID="Menu1" runat="server">
<LayoutTemplate>
<li class="dropdown">
<a class="dropdown-toggle" data-toggle="dropdown" href="#">Tables <b class="caret"></b></a>
<ul class="dropdown-menu">
<li runat="server" id="itemPlaceholder"></li>
</ul>
</li>
</LayoutTemplate>
<ItemTemplate>
<li runat="server">
<asp:DynamicHyperLink ID="HyperLink1" runat="server"><%# Eval("DisplayName") %></asp:DynamicHyperLink>
</li>
</ItemTemplate>
</asp:ListView>
</ul>
</div>
</div>
Listing 1 – the Menu mark-up
protected void Page_Load(object sender, EventArgs e)
{
    System.Collections.IList visibleTables = Global.DefaultModel.VisibleTables;
    if (visibleTables.Count == 0)
    {
        throw new InvalidOperationException("There are no accessible tables...");
    }
    Menu1.DataSource = visibleTables;
    Menu1.DataBind();
}
Listing 2 – the Page_Load moved to Site.master
Date Picker
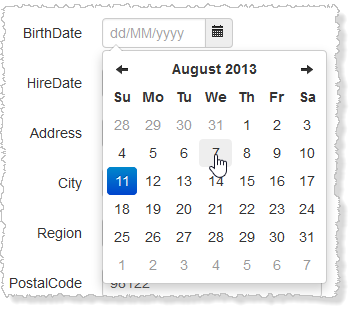
Add the Bootstrap Date Picker using NuGet
Figure 2 – Bootstrap Date Picker
Then copy the DateTime and DateTime_Edit Field Templates and rename to Date and Date_Edit, then add a script and CSS references to the Site.master.
<div class="controls">
    <div class="input-append date" id="DivDate" runat="server">
        <div class="input-append">
            <asp:TextBox
                ID="TextBox1"
                runat="server"
                CssClass="input-small" />
            <span class="add-on"><i class="icon-calendar"></i></span>
        </div>
        <asp:RequiredFieldValidator
            runat="server"
            ID="RequiredFieldValidator1"
            CssClass=""
            ControlToValidate="TextBox1"
            Display="Static"
            Enabled="false"/>
        <asp:RegularExpressionValidator
            runat="server"
            ID="RegularExpressionValidator1"
            CssClass=""
            ControlToValidate="TextBox1"
            Display="Static"
            Enabled="false"/>
        <asp:DynamicValidator
            runat="server"
            ID="DynamicValidator1"
            CssClass=""
            ControlToValidate="TextBox1"
            Display="Static"/>
        <asp:CustomValidator
            runat="server"
            ID="DateValidator"
            CssClass=""
            ControlToValidate="TextBox1"
            Display="Static"
            EnableClientScript="false"
            Enabled="false"
            OnServerValidate="DateValidator_ServerValidate"/>
    </div>
</div>
Listing 3 – Date_Edit.ascs mark-up
// get default display format
var dateFormat = CultureInfo.CurrentCulture.DateTimeFormat.ShortDatePattern;

// create script
var datePickerScript = String.Format("$('#{0}').datepicker();", DivDate.ClientID);
Page.AddStartupClientScript(String.Format("{0}{1}BootstrapDatePicker", Table.Name, Column.Name), datePickerScript);

DivDate.Attributes.Add("data-date-format", dateFormat.ToLower());
TextBox1.Attributes.Add("placeholder", dateFormat);
TextBox1.ToolTip = Column.Description;

TextBox1.Columns = DateTime.Now.ToString(dateFormat).Length;
Listing 3 – Date_Edit.ascx.cs
Listings 2 & 3 show the necessary code to create the Date Field Templates

Figure 3 – Bootstrap Date Picker in Action
The Project is on Bootstrap Friendly Control Adaptors and on my SkyDrive

No comments:
Post a Comment