To create this project we are going to get a bit of a leg up, we are going to take as our starting point the GridVew Adaptor from the ASP.NET 2.0 CSS Friendly Control Adapters 1.0 source code here CSS Friendly Control Adapters now the last update was Mar 5, 2007 so it was not created for .Net 4, 4.5 or even 4.5.1 but since we know it works after a fashion from my previous blog post we know we can use the GirdView adaptor as least as a starting point.
Getting setup
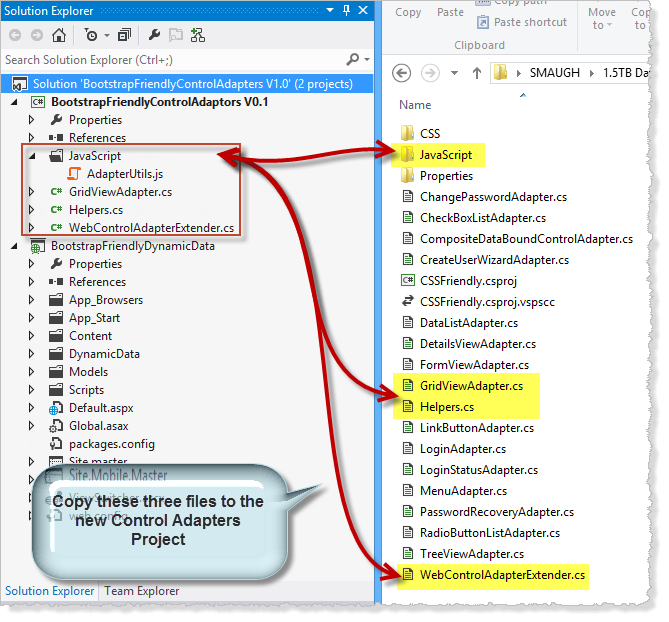
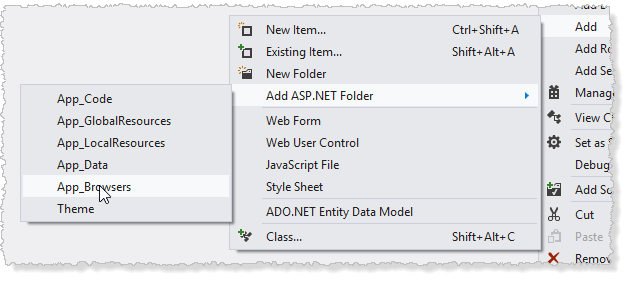
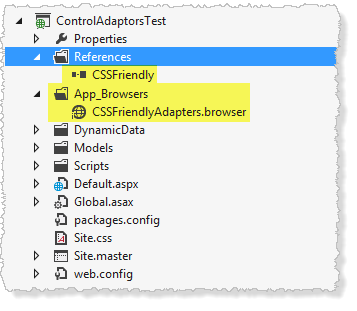
Figure 1 – Get the GridViewAdapter and helper files and the JavaScript file
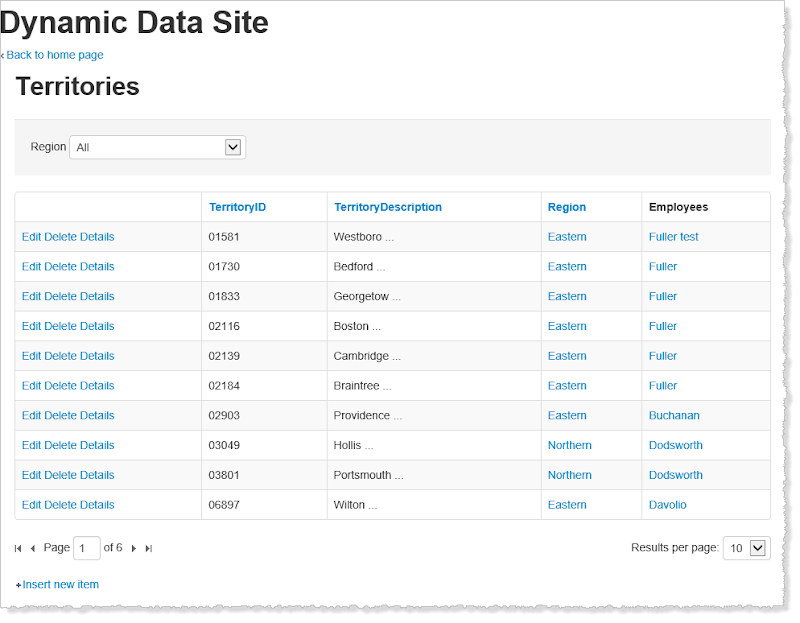
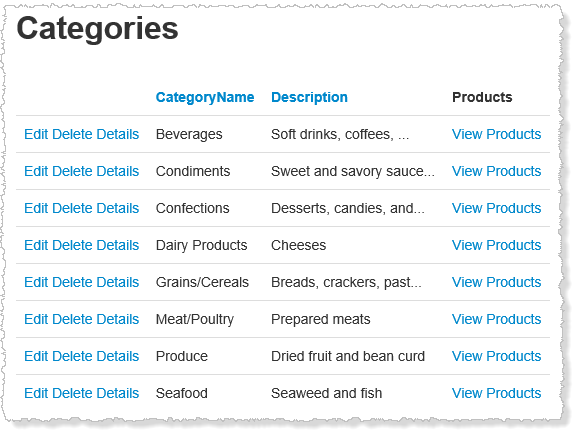
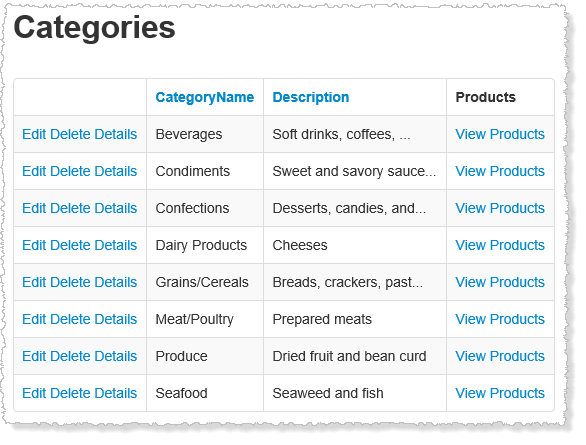
We will start with the project from the last post if you followed all we need to do is remove the references to the old CSS Friendly Control Adapters and add a reference to our BootstrapFriendlyControlAdapters give the application a run and here we are
Figure 2 – the default GridView Adapter in use
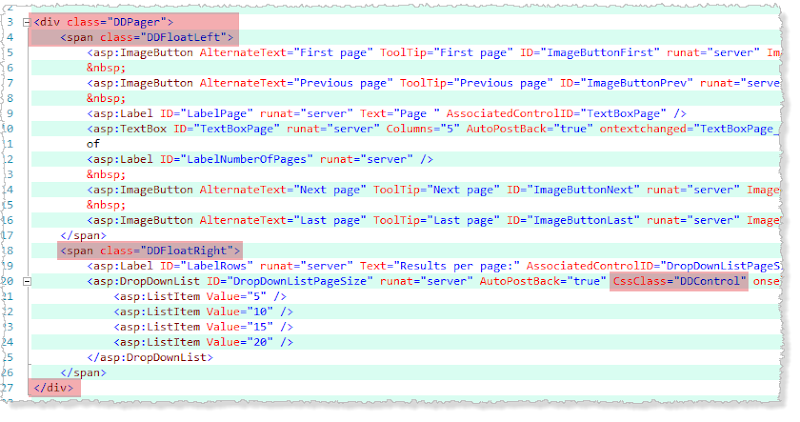
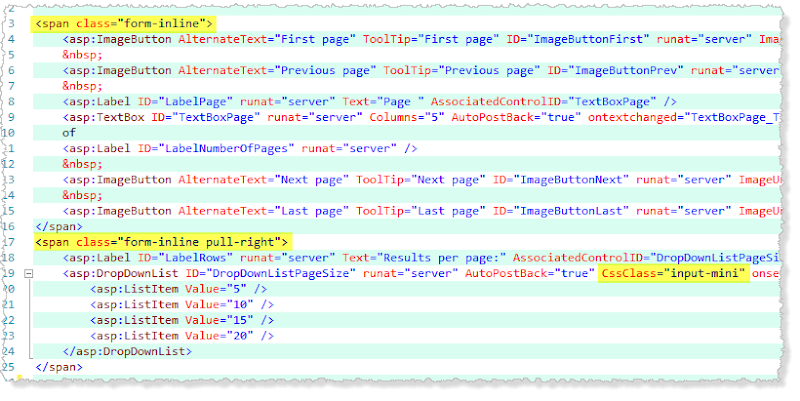
As you will see the pager is not displaying correctly so lets fix that. In Figure 3 we can see the issues highlighted, so what I did was remove the outer DIV and change the class for each of the inner SPANs (see Figure 4) I have added the class form-inline to both spans and to the right span which we want to be pulled left I have added the pull-left class.
Figure 3 – pager with issues
Figure 4 – pager with issues fixed
Next we need to re-write some of the WritePagerSection method Listing 1.
/// <remarks>Listing 1 – WritePagerSection method
/// Patch provided by Wizzard to support PagerTemplate (CodePlex issue #3368).
/// </remarks>
private void WritePagerSection(HtmlTextWriter writer, PagerPosition pos)
{
GridView gridView = Control as GridView;
if ((gridView != null) &&
gridView.AllowPaging &&
gridView.PagerSettings.Visible &&
(gridView.PageCount > 1) &&
((gridView.PagerSettings.Position == pos) || (gridView.PagerSettings.Position == PagerPosition.TopAndBottom)))
{
GridViewRow pagerRow = (pos == PagerPosition.Top) ? gridView.TopPagerRow : gridView.BottomPagerRow;
string className = GetRowClass(gridView, pagerRow);
className += " AspNet-GridView-" + (pos == PagerPosition.Top ? "Top " : "Bottom ");
//check for PagerTemplate
if (gridView.PagerTemplate != null)
{
if (gridView.PagerStyle != null)
{
className += gridView.PagerStyle.CssClass;
}
className = className.Trim();
writer.WriteLine();
writer.WriteBeginTag("div");
writer.WriteAttribute("class", className);
writer.Write(HtmlTextWriter.TagRightChar);
writer.Indent++;
if (pagerRow != null)
{
foreach (TableCell cell in pagerRow.Cells)
{
foreach (Control ctrl in cell.Controls)
{
ctrl.RenderControl(writer);
}
}
}
writer.Indent--;
writer.WriteEndTag("div");
}
else //if not a PagerTemplate
{
Table innerTable = null;
if ((pos == PagerPosition.Top) &&
(gridView.TopPagerRow != null) &&
(gridView.TopPagerRow.Cells.Count == 1) &&
(gridView.TopPagerRow.Cells[0].Controls.Count == 1) &&
typeof(Table).IsAssignableFrom(gridView.TopPagerRow.Cells[0].Controls[0].GetType()))
{
innerTable = gridView.TopPagerRow.Cells[0].Controls[0] as Table;
}
else if ((pos == PagerPosition.Bottom) &&
(gridView.BottomPagerRow != null) &&
(gridView.BottomPagerRow.Cells.Count == 1) &&
(gridView.BottomPagerRow.Cells[0].Controls.Count == 1) &&
typeof(Table).IsAssignableFrom(gridView.BottomPagerRow.Cells[0].Controls[0].GetType()))
{
innerTable = gridView.BottomPagerRow.Cells[0].Controls[0] as Table;
}
if ((innerTable != null) && (innerTable.Rows.Count == 1))
{
if (gridView.PagerStyle != null)
{
className += gridView.PagerStyle.CssClass;
}
className = className.Trim();
writer.WriteLine();
writer.WriteBeginTag("div");
writer.WriteAttribute("class", className);
writer.Write(HtmlTextWriter.TagRightChar);
writer.Indent++;
TableRow row = innerTable.Rows[0];
foreach (TableCell cell in row.Cells)
{
foreach (Control ctrl in cell.Controls)
{
writer.WriteLine();
ctrl.RenderControl(writer);
}
}
writer.Indent--;
writer.WriteLine();
writer.WriteEndTag("div");
}
}
}
}
One of the main issues and it’s to my shame ![]() I originally wrote this section. So here is the issue I am surrounding the pagers with a DIV instead of the correct section this means that the
I originally wrote this section. So here is the issue I am surrounding the pagers with a DIV instead of the correct section this means that the
<table>
    <thead>
        ...
    </thead>
    <tbody>
        ...
    </tbody>
    <tfoot>
        <tr> --footer goes here-- </tr>
    </tfoot>
</table>
Listing 2 -
Figure 5 - The Default GridView Adapter In Use DIV and Position Issue
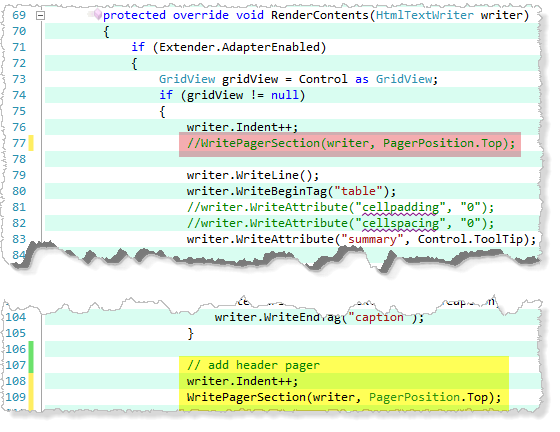
There are two issues here the first is that the pager is positioned outside the table when its rendered and second it’s in a DIV as mentioned above so we need to modify this section to place the pager inside the table and in side a TFOOT section when at the bottom and a THEAD when at the top.
Figure 6 – Move Header Pager Inside Table
Figure 7 – Move Footer Pager Inside Table
/// <remarks>
/// Patch provided by Wizzard to support PagerTemplate (CodePlex issue #3368).
/// </remarks>
private void WritePagerSection(HtmlTextWriter writer, PagerPosition pos)
{
    GridView gridView = Control as GridView;
    string tableHeaderFooter = pos == PagerPosition.Top ? "thead" : "tfoot";
    string tableCell = pos == PagerPosition.Top ? "th" : "td";

    if ((gridView != null) && gridView.AllowPaging && gridView.PagerSettings.Visible && (gridView.PageCount > 1) &&
            ((gridView.PagerSettings.Position == pos) || (gridView.PagerSettings.Position == PagerPosition.TopAndBottom)))
    {
        GridViewRow pagerRow = (pos == PagerPosition.Top) ? gridView.TopPagerRow : gridView.BottomPagerRow;
        string className = GetRowClass(gridView, pagerRow);
        //className += " " + (pos == PagerPosition.Top ? "Top " : "Bottom ");

        //check for PagerTemplate
        if (gridView.PagerTemplate != null)
        {
            if (gridView.PagerStyle != null)
            {
                className += gridView.PagerStyle.CssClass;
            }
            className = className.Trim();

            // get pager section type
            writer.WriteLine();
            writer.WriteBeginTag(tableHeaderFooter); // change div to tfoot
            writer.WriteAttribute("class", className);
            writer.Write(HtmlTextWriter.TagRightChar);
            writer.Indent++;

            // add opening row
            writer.WriteBeginTag("tr");
            writer.Write(HtmlTextWriter.TagRightChar);
            writer.Indent++;

            // add opening cell
            writer.WriteBeginTag(tableCell);
            // add colspan to cell
            writer.WriteAttribute("colspan", gridView.HeaderRow.Cells.Count.ToString());
            writer.Write(HtmlTextWriter.TagRightChar);
            writer.Indent++;

            if (pagerRow != null)
            {
                foreach (TableCell cell in pagerRow.Cells)
                {
                    foreach (Control ctrl in cell.Controls)
                    {
                        ctrl.RenderControl(writer);
                    }
                }
            }

            // add closing cell
            writer.Indent--;
            writer.WriteEndTag(tableCell);

            // add closing row
            writer.Indent--;
            writer.WriteEndTag("tr");

            writer.Indent--;
            writer.WriteEndTag(tableHeaderFooter); // change div to tfoot
        }
        else //if not a PagerTemplate
        {
            Table innerTable = null;
            if ((pos == PagerPosition.Top) &&
                    (gridView.TopPagerRow != null) &&
                    (gridView.TopPagerRow.Cells.Count == 1) &&
                    (gridView.TopPagerRow.Cells[0].Controls.Count == 1) &&
                    typeof(Table).IsAssignableFrom(gridView.TopPagerRow.Cells[0].Controls[0].GetType()))
            {
                innerTable = gridView.TopPagerRow.Cells[0].Controls[0] as Table;
            }
            else if ((pos == PagerPosition.Bottom) &&
                    (gridView.BottomPagerRow != null) &&
                    (gridView.BottomPagerRow.Cells.Count == 1) &&
                    (gridView.BottomPagerRow.Cells[0].Controls.Count == 1) &&
                    typeof(Table).IsAssignableFrom(gridView.BottomPagerRow.Cells[0].Controls[0].GetType()))
            {
                innerTable = gridView.BottomPagerRow.Cells[0].Controls[0] as Table;
            }

            if ((innerTable != null) && (innerTable.Rows.Count == 1))
            {
                if (gridView.PagerStyle != null)
                {
                    className += gridView.PagerStyle.CssClass;
                }
                className = className.Trim();

                writer.WriteLine();
                writer.WriteBeginTag(tableHeaderFooter);
                writer.WriteAttribute("class", className);
                writer.Write(HtmlTextWriter.TagRightChar);
                writer.Indent++;

                TableRow row = innerTable.Rows[0];
                foreach (TableCell cell in row.Cells)
                {
                    foreach (Control ctrl in cell.Controls)
                    {
                        writer.WriteLine();
                        ctrl.RenderControl(writer);
                    }
                }

                writer.Indent--;
                writer.WriteLine();
                writer.WriteEndTag(tableHeaderFooter);
            }
        }
    }
}
Listing 3 – Updated WritePagerSection
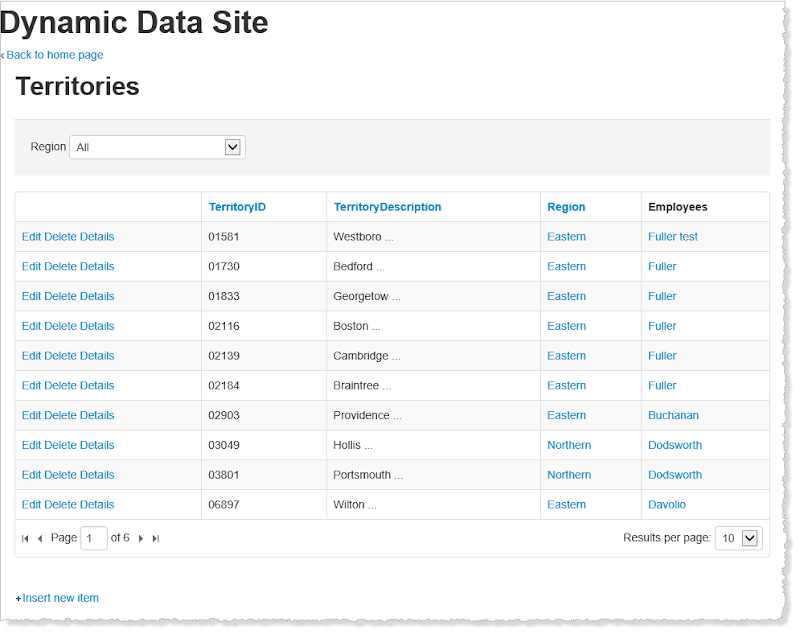
The gives us
Figure 6 – The default GridViewAdapter in use with pager issue fixed
Adapting the GridView Adapter
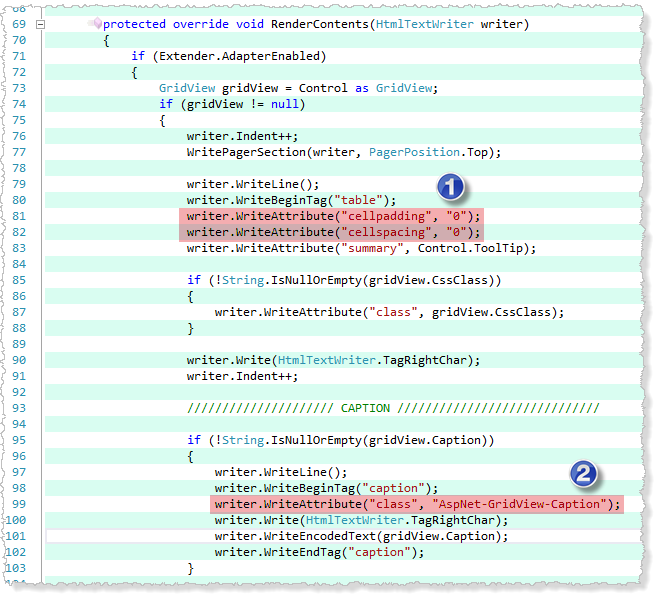
If we look through the code of the GridView Adapter we will see lots of CSS classes being added these are mostly surplus to our need so we will remove them, also there are attributes being added that we don’t want such as those seen in Figure 6 section 1 has some attributes we do not want as we will control this via CSS and in 2 you can see one of the unwanted CSS classes being added, this style is for the caption which Bootstrap already styles.
Figure 7 – the creating the table tag
writer.WriteAttribute("cellpadding", "0");
writer.WriteAttribute("cellspacing", "0");
For block (2) since there is no Caption.CssClass on the GridView we cannot revert to just showing this if you feel the need for an specific class for the Caption element then feel free to add one by changing the appropriate line.
So the one thing that we can’t get for free as it were from Bootstrap on table formatting is the selected row see the Bootstrap Documentation so we need to make sure the SelectedRowStyle.CssClass is used for that se we need to look at the GetRowClass private method in the GridViewAdaptor see Listing 4 we need to make sure each property is only adding the specified CssClass. The main thing we do not need in Listing 4 is the “AspNet-GridView-xxxx” classes we only want the classes we specify explicitly to be used.
/// <summary>
/// Gets the row's CSS class.
/// </summary>
/// <param name="gridView">The grid view.</param>
/// <param name="row">The row.</param>
/// <returns>The CSS class.</returns>
/// <remarks>
/// Modified 10/31/2007 by SelArom to create CSS classes for all different row types and states.
/// </remarks>
private string GetRowClass(GridView gridView, GridViewRow row)
{
    string className = row.CssClass;

    switch (row.RowType)
    {
        case DataControlRowType.Header:
            className += " AspNet-GridView-Header " + gridView.HeaderStyle.CssClass;
            break;
        case DataControlRowType.Footer:
            className += " AspNet-GridView-Footer " + gridView.FooterStyle.CssClass;
            break;
        case DataControlRowType.EmptyDataRow:
            className += " AspNet-GridView-Empty " + gridView.EmptyDataRowStyle.CssClass;
            break;
        case DataControlRowType.Separator:
            className += " AspNet-GridView-Separator ";
            break;
        case DataControlRowType.Pager:
            className += " AspNet-GridView-Pagination " + gridView.PagerStyle.CssClass;
            break;
        case DataControlRowType.DataRow:
            switch (row.RowState)
            {
                case DataControlRowState.Normal:
                    className += " AspNet-GridView-Normal " + gridView.RowStyle.CssClass;
                    break;
                case DataControlRowState.Alternate:
                    className += " AspNet-GridView-Alternate " + gridView.AlternatingRowStyle.CssClass;
                    break;
                case DataControlRowState.Selected | DataControlRowState.Normal:
                case DataControlRowState.Selected | DataControlRowState.Alternate:
                    className += " AspNet-GridView-Selected " + gridView.SelectedRowStyle.CssClass;
                    break;
                case DataControlRowState.Edit | DataControlRowState.Normal:
                case DataControlRowState.Edit | DataControlRowState.Alternate:
                    className += " AspNet-GridView-Edit " + gridView.EditRowStyle.CssClass;
                    break;
                case DataControlRowState.Insert:
                    className += " AspNet-GridView-Insert ";
                    break;
            }
            break;
    }

    return className.Trim();
}
Listing 4 – GetRowClass private method
/// <summary>
/// Gets the row's CSS class.
/// </summary>
/// <param name="gridView">The grid view.</param>
/// <param name="row">The row.</param>
/// <returns>The CSS class.</returns>
/// <remarks>
/// Modified 2013-07-27 by Stephen J Naughton to use default CSS classes for each row type.
/// </remarks>
private string GetRowClass(GridView gridView, GridViewRow row)
{
    string className = row.CssClass;

    switch (row.RowType)
    {
        case DataControlRowType.Header:
            className += gridView.HeaderStyle.CssClass;
            break;
        case DataControlRowType.Footer:
            className += gridView.FooterStyle.CssClass;
            break;
        case DataControlRowType.EmptyDataRow:
            className += gridView.EmptyDataRowStyle.CssClass;
            break;
        case DataControlRowType.Separator:
            // we may want to indicate that there is a Separator here
            className += " separator "; // need to check that this are not already in use in Bootstrap
            break;
        case DataControlRowType.Pager:
            className += gridView.PagerStyle.CssClass;
            break;
        case DataControlRowType.DataRow:
            switch (row.RowState)
            {
                case DataControlRowState.Normal:
                    className += gridView.RowStyle.CssClass;
                    break;
                case DataControlRowState.Alternate:
                    className += gridView.AlternatingRowStyle.CssClass;
                    break;
                case DataControlRowState.Selected | DataControlRowState.Normal:
                case DataControlRowState.Selected | DataControlRowState.Alternate:
                    className += gridView.SelectedRowStyle.CssClass;
                    break;
                case DataControlRowState.Edit | DataControlRowState.Normal:
                case DataControlRowState.Edit | DataControlRowState.Alternate:
                    className += gridView.EditRowStyle.CssClass;
                    break;
                case DataControlRowState.Insert:
                    // we may want to indicate that there is an insert here
                    className += " insert "; // need to check that this are not already in use in Bootstrap
                    break;
            }
            break;
    }

    return className.Trim();
}
Listing 5 – Updated GetRowClass
Listing 5 fixes up the GetRowClass so now we can specify our own CSS class for the parts of the grid we want to override.
Adding a Bootstrap Pager to the GridView Adapter
The last thing I want to do is add a Bootstrap compatible pager
Figure 8 – Bootstrap Pager
I will continue this post with the fancy pager next time.
See my SkyDrive here for download details