Wednesday 28 January 2009

Making Individual Tables Read Only – Dynamic Data

These are two thing you can do to make your table Read Only.

  1. Add an attribute for instance the ReadOnlyAttribute or your own custom attribute
  2. Using Routing to restrict access to the Edit or Insert pages

The first solution I covered in this article Writing Attributes and Extension Methods for Dynamic Data so I’ll just show the Routing example here.

// Setting a table to Read only
var visibleTables = from t in MetaModel.Default.Tables
                    where t.Scaffold == true
                    select t;

var readOnlyTables = new StringBuilder();
foreach (var table in visibleTables)
{
    var isReadOnly = table.Attributes.OfType<ReadOnlyAttribute>().
DefaultIfEmpty(new ReadOnlyAttribute(false)).
FirstOrDefault();
    if (isReadOnly.IsReadOnly)
        readOnlyTables.Append(table.Name + "|");
}

routes.Add(new DynamicDataRoute("{table}/{action}.aspx")
{
    Constraints = new RouteValueDictionary(new
    {
        action = "Edit|Insert",
        table = readOnlyTables.ToString().Substring(0, readOnlyTables.Length - 1)
    }),
    ViewName = "Details",
    Model = model
});

Listing 1 – Routing example.

[ReadOnly(true)]
public partial class Employee {}

Listing 2 – sample attribute.

In Listing 1 we see three things going on:

  1. We get a list of visible tables using the Scaffold attribute to find out if the table should be shown.
  2. Next we loop through the visible tables and if the table is set to ReadOnly then we add it to the readOnlyTables StringBuilder to build a list of read only tables (e.g. “Products|Customers”).
  3. Build a route that constrains the these tables to only get to the Details page.
Note: That this route must appear before the default routes.

Happy coding and remember your a PC HappyWizard but for us coders I prefer the short lived “Live to Code and Code to Live”

Important: The only caveat here is that the Delete button still works. :( But you could catch that in Business logic if you didn’t want to edit each page.

Monday 26 January 2009

Disallow Navigation on ForeignKey FieldTemplate – Dynamic Data

This article originates from a post I ding on the ASP.NET Dynamic Data Forum here Re: A few problems with my dynamic data website, Rick Anderson suggesting that it would be a useful post to link to in his FAQ. So here it is for easy access rather than having to search the forum for it.

HappyWizard

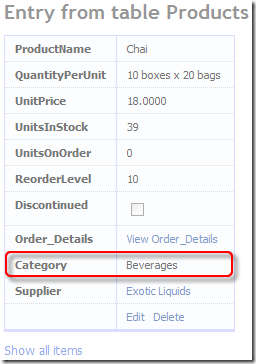
Firstly the idea is that you want to show the name of the entity but not link to if from the ForeignKey FieldTemplate.

Category has Navigation disabled

Figure 1 - Category has Navigation disabled

The code we need for this comes in three parts

  1. The Attribute
  2. The modification the the FieldTemplate
  3. The Metadata.

The Attribute

[AttributeUsage(AttributeTargets.Property)]
public class AllowNavigationAttribute : Attribute
{
    public Boolean Show { get; private set; }

    public AllowNavigationAttribute(Boolean show)
    {
        Show = show;
    }
    // this will allow us to have a default set to false
    public static AllowNavigationAttribute Default = new 
AllowNavigationAttribute
(true); }

Listing 1 – AllowNavigation attribute

Note the use of the Default see Writing Attributes and Extension Methods for Dynamic Data for the details on why.

The modification the the FieldTemplate

Now we need to add a little change to the ForeignKey.aspx.cs file which can be found in the ~/DynamicData/FieldTemplates folder of your Dynamic Data site.

protected string GetNavigateUrl()
{
    var allow = Column.Attributes.OfType<AllowNavigationAttribute>()
                .DefaultIfEmpty(new AllowNavigationAttribute(true))
                .FirstOrDefault().Show;
    if (!AllowNavigation || !allow)
    {
        return null;
    }

    if (String.IsNullOrEmpty(NavigateUrl))
    {
        return ForeignKeyPath;
    }
    else
    {
        return BuildForeignKeyPath(NavigateUrl);
    }
}

Listing 2 – ForeignKey FieldTemplate modifications

All we’ve done here is get the attribute into the allow variable and the add it to the checks in the if statement so that:

  • If the internal AllowNavigation is set then null is returned.
  • If the custom attribute is set null is returned.

The Metadata

[MetadataType(typeof(ProductMD))]
public partial class Product
{
    public partial class ProductMD
    {
       //EntityRef
        [AllowNavigation(false)]
        public object Category {get;set;}
    }
}

Listing 3 – sample Metadata

Now if you attribute a foreign key column up with the AllowNavigationAttribute you can turn off the hyperlink.

Happy Coding and remember You’re a PC HappyWizard

Saturday 24 January 2009

Setting the Initial Sort Order – Dynamic Data

This is just a quick note on a post I made on the Dynamic Data Forum to answer a question where setting the DisplayColumnAttribute should set the default sort order of the GridView on the List page but didn’t. Here’s how I solved it with a hint or two from Marcin Dobosz.

[MetadataType(typeof(Orders_Metadata ))]
[DisplayColumn("OrderID", "OrderID", true)]
public partial class Orders
{
    public class Orders_Metadata
    {
... }
}

Listing 1 – Example Metadata

Assuming you have a table with the DisplayColumnAttribute set you could put this on your List page: 

var displayColumn = table.GetAttribute<DisplayColumnAttribute>();
if (displayColumn != null && displayColumn.SortColumn != null)
{
    GridView1.Sort(displayColumn.SortColumn,
        displayColumn.SortDescending ? SortDirection.Descending : SortDirection.Ascending);
}

Listing 2 – Edit the Page_Load event handler and add the following code

public static T GetAttribute<T>(this MetaTable table) where T : Attribute
{
    return table.Attributes.OfType<T>().FirstOrDefault();
}

Listing 3 – you will also need this extension method see Writing Attributes and Extension Methods for Dynamic Data

Add your DisplayColumnAttribute (see Listing 1) to the table you want sorted (note: it must have the second string constant even if it’s the same name, as the second string it the one that the sort is done on, and the third value if true causes the sort to be descending). Then in Listing 2 you get the attribute using the extension method from Listing 3 and apply the relevant sort.

This is here mainly so I can find it again! HappyWizard

Friday 23 January 2009

Making a Field Read-Only via the ReadOnlyAttribute – Dynamic Data

This article is as a result of this thread not editable attribute on the Dynamic Data Forum:

What you need to do is:

  1. Use the ReadOnlyAttribute in System.ComponentModel and attribute up the column you want as read only in edit mode

  2. Create an class that implements IAutoFieldGenrator.

  3. A custom DynamicField.

And here's the sample:

using System.Collections;
using System.Collections.Generic;
using System.ComponentModel;
using System.Linq;
using System.Web.DynamicData;
using System.Web.UI;
using System.Web.UI.WebControls;

public class FieldsManager : IAutoFieldGenerator
{
    protected MetaTable _table;

    public FieldsManager(MetaTable table)
    {
        _table = table;
    }

    public ICollection GenerateFields(Control control)
    {
        var oFields = new List<DynamicField>();

        foreach (var column in _table.Columns)
        {
            // carry on the loop at the next column  
            // if scaffold table is set to false or DenyRead
            if (!column.Scaffold || column.IsLongString)
                continue;

            DynamicField f;

            // here we check to dee
            if (column.Attributes.OfType<ReadOnlyAttribute>().
DefaultIfEmpty(new ReadOnlyAttribute(false)).
FirstOrDefault().IsReadOnly) f = new DynamicReadonlyField(); else f = new DynamicField(); f.DataField = column.Name; oFields.Add(f); } return oFields; } } // special thanks to david Ebbo for this public class DynamicReadonlyField : DynamicField { public override void InitializeCell( DataControlFieldCell cell, DataControlCellType cellType, DataControlRowState rowState, int rowIndex) { if (cellType == DataControlCellType.DataCell) { var control = new DynamicControl() { DataField = DataField }; // Copy various properties into the control control.UIHint = UIHint; control.HtmlEncode = HtmlEncode; control.NullDisplayText = NullDisplayText; // this the default for DynamicControl and has to be // manually changed you do not need this line of code // its there just to remind us what we are doing. control.Mode = DataBoundControlMode.ReadOnly; cell.Controls.Add(control); } else { base.InitializeCell(cell, cellType, rowState, rowIndex); } } }

And in the Edit page add:

protected void Page_Init(object sender, EventArgs e)
{
    DynamicDataManager1.RegisterControl(DetailsView1);
    table = DetailsDataSource.GetTable();
    DetailsView1.RowsGenerator = new FieldsManager(table);
}

In the Page_Init add the BOLD ITALIC lines

This is a direct copy of the answer I gave in the thread HappyWizard

Getting Default Values from List page Filters for Insert – Dynamic Data

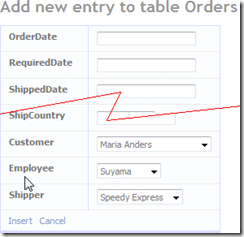
The Idea here is that when you are navigating through your pages you will select some filters on the way as here in Figure 1 where we have selected a Customer an Employee and a Shipper so what I wanted was not to throw away that information when I clicked insert and then get Figure 2.

Filtered Liast page

Figure 1 – Filtered List page

Values Defaulted on Insert

Figure 2 – Values Defaulted on Insert

Steps to Accomplish this:

  1. Modify ForeignKey_Edit.aspx.cs to check for query string parameters relating the column.
  2. Create a couple of extension methods to get the filters and then return a string of key, value query string.
  3. Hook up the Insert hyperlink to have these parameters if available to the insert URL.

Hope that makes sense.

Modify ForeignKey_Edit to check for query string parameters relating the column

This is relatively simple we just add an event handler to the DropDownList1’s PreRender event ForeignKey_Edit FieldTemplate code behind file.

protected void DropDownList1_PreRender(object sender, EventArgs e)
{
    // Adding a default value to a textbox
    // value aquired via query string
    string value = Request.QueryString[Column.Name];
    if (this.Mode == DataBoundControlMode.Insert && !string.IsNullOrEmpty(value))
    {
        ListItem item = DropDownList1.Items.FindByValue(value);
        if (item != null)
            DropDownList1.SelectedValue = value;
    }
}

Listing 1 – DropDownList’s PreRender event handler

Note: Don’t forget to wire up the event hander after pasting in the code.

What this does is check to see if there is a QueryString parameter that matches the column name and if this matches a value in the DropDownList’s Items collection it set’s this value as the DropDownList’s SelectedValue.

Creating Extension Methods that get the FilterUserControls and Return a String of Key, Value query string

There are two extension methods required:

  1. Gets a collection of the filters from the FilterRepeater that have a value.
  2. Take the filters and extract the key values pairs and return them as a QueryString to be appended to the Insert URL

Here’s the first one:

public static IEnumerable<FilterUserControlBase> GetFilterControls(this FilterRepeater filterRepeater)
{
    var filters = new List<FilterUserControlBase>();

    foreach (RepeaterItem item in filterRepeater.Items)
    {
        var filter = item.Controls.OfType<FilterUserControlBase>().FirstOrDefault();
        if (filter != null)
            filters.Add(filter);
    }

    return filters.AsEnumerable();
}

Listing 2 – GetFilterControls extension method.

This extension method shown in Listing 2 just loops through the FilterRepeater Items collection and using the OfType<T>() Linq extension method gets the FilterUserControl from it’s controls collection. Then adds this to the the list of found filters and finally returns the list.

public static String GetQueryStringParameters(this FilterRepeater filterRepeater)
{
    var filterControls = filterRepeater.GetFilterControls();
    if (filterControls.Count() > 0)
    {
        var queryParameters = new StringBuilder();
        queryParameters.Append("?");
        foreach (var filter in filterControls)
        {
            if (filter.SelectedValue != "")
                queryParameters.Append(filter.DataField + "=" + filter.SelectedValue + "&");
        }
        return queryParameters.ToString().Substring(0, queryParameters.Length - 1);
    }
    else
        return "";
}

Listing 3 – GetQueryStringParameters extensionmethod.

The second extension method shown in Listing 3 takes the output of the first and then loops through building the query parameters string for passing back to the caller.

Hook up the Insert hyperlink to the Returned Query Parameters

Now in the List page all you need to do is add the following code:

// setup the insert hyperlink
InsertHyperLink.NavigateUrl = table.GetActionPath(PageAction.Insert) 
    + FilterRepeater.GetQueryStringParameters();

Listing 4 – Putting the extension methods to use.

And this is why I like c# 3.0 extension methods so much HappyWizard

Tuesday 20 January 2009

Writing Attributes and Extension Methods for Dynamic Data

This is just a short article on some useful tips I’ve found for writing Attributes for Dynamic Data.

I say Tips there really isn’t that much to this.

Let me show you an attribute I just created for a post on the Dynamic Data Forum:

[AttributeUsage(AttributeTargets.Class, AllowMultiple = false)]
public class DisableEditingAttribute : Attribute
{
    public Boolean Disable { get; set; }

    public static DisableEditingAttribute Default = new DisableEditingAttribute();

    public DisableEditingAttribute() : this(false) { }

    public DisableEditingAttribute(Boolean disable)
    {
        Disable = disable;
    }
}

Listing 1 – Disable Editing Attribute

And here’s it being used in the List page:

protected void Page_Load(object sender, EventArgs e)
{
    table = GridDataSource.GetTable();
    Title = table.DisplayName;

    //GridView1.Sort("ColumnName, ColumnName", SortDirection.Descending);

    InsertHyperLink.NavigateUrl = table.GetActionPath(PageAction.Insert);

    // Disable various options if the table is readonly
    var editingDisabled = table.Attributes.OfType<DisableEditingAttribute>().DefaultIfEmpty(new DisableEditingAttribute()).FirstOrDefault();
    if (table.IsReadOnly || editingDisabled.Disable)
    {
        GridView1.Columns[0].Visible = false;
        InsertHyperLink.Visible = false;
    }
}

Listing 2 – DisableEditingAttribute in use BOLD ITALIC

The first ting to note is a Linq thing; the DefautIfEmpty extension method. This is used to specify a default value if the returned value is null (From the OfType FirstOrDefault combination) this means I don’t have to test for null like:

// Disable various options if the table is readonly
var editingDisabled = table.Attributes.OfType<DisableEditingAttribute>().FirstOrDefault();
if (table.IsReadOnly || (editingDisabled != null && editingDisabled.Disable))
{
    GridView1.Columns[0].Visible = false;
    InsertHyperLink.Visible = false;
}

Listing 3 – Having to test for null

Another way of doing this would be to use a Default static method to provide the default value.

// Disable various options if the table is readonly
var editingDisabled = table.Attributes.OfType<DisableEditingAttribute>().
    DefaultIfEmpty(DisableEditingAttribute.Default).FirstOrDefault();
if (table.IsReadOnly || editingDisabled.Disable)
{
    GridView1.Columns[0].Visible = false;
    InsertHyperLink.Visible = false;
}

Listing 4 – using the Default static method

Either method works but my preference is to have a default constructor Attribute() and I’ll explain why. But first let me show you an Extension method I found in the Dynamic Data Futures project extension methods:

public static T GetAttribute<T>(this MetaTable table) where T : Attribute
{
    return table.Attributes.OfType<T>().FirstOrDefault();
}

Listing 5 – the GetAttribute Generic extension method.

And it’s use:

// Disable various options if the table is readonly
var editingDisabled = table.GetAttribute<DisableEditingAttribute>();
if (table.IsReadOnly || (editingDisabled != null && editingDisabled.Disable))
{
    GridView1.Columns[0].Visible = false;
    InsertHyperLink.Visible = false;
}

Listing 6 – the GetAttribute extension method in use

This is better more readable code but the test for null makes it a bit messy. So here are my interpretations of the GetAttribute extension method:

public static T GetAttributeOrDefault<T>(this MetaTable table) where T : Attribute, new()
{
    return table.Attributes.OfType<T>().DefaultIfEmpty(new T()).FirstOrDefault();
}

public static T GetAttributeOrDefault<T>(this MetaColumn column) where T : Attribute, new()
{
    return column.Attributes.OfType<T>().DefaultIfEmpty(new T()).FirstOrDefault();
}

Listing 7 – My GetAttributeOrDefault extension methods

All I’ve done here is use the DefaultIfEmpty Linq extension method and added an extra constraint to the generic class the make the extension method only work with attributes that have an explicit default Constructor.

And just for completeness here are all the generic extension methods together:

public static T GetAttributeOrDefault<T>(this MetaTable table) where T : Attribute, new()
{
    return table.Attributes.OfType<T>().DefaultIfEmpty(new T()).FirstOrDefault();
}

public static T GetAttribute<T>(this MetaTable table) where T : Attribute
{
    return table.Attributes.OfType<T>().FirstOrDefault();
}

public static T GetAttributeOrDefault<T>(this MetaColumn column) where T : Attribute, new()
{
    return column.Attributes.OfType<T>().DefaultIfEmpty(new T()).FirstOrDefault();
}

public static T GetAttribute<T>(this MetaColumn column) where T : Attribute
{
    return column.Attributes.OfType<T>().FirstOrDefault();
}

Listing 8 – All Generic Attributes together

The one in BOLD ITALIC is the original from Dynamic Data Futures project.


I think C# 3.0 is real neat HappyWizard

Monday 19 January 2009

Dynamic Data – Cascading FieldTemplates

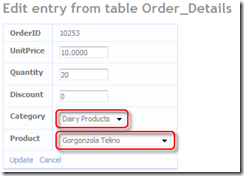
So before I dive into an explanation of this feature I’d better explain what I’m doing here. Firstly have a look at Figure 1.
Cascading ForeignKey_Edit like FieldTemplates

Figure 1 – Cascading ForeignKey_Edit like FieldTemplates

In Figure 1 you can see two DropDownLists Category and Products is this form you are only allowed to choose a product the matches the selected category. So what is required, is when Category is changes then the contents of  Product should be regenerated to be filtered by the chosen Category. I hope that make some sense.

The requirements for the above to work are:

  1. A way to get the parent DetailsView from inside a FieldTemplate.
  2. Some way of finding the FieldTemplate from the parent control tree of the dependant FileTemplate.
  3. Some way of getting the dependee FieldTemplate to fire an event on the dependant FieldTemplate when a change is made on dependee.
  4. An Attribute to tell the control which control to use as the dependee control.
Note: I am using the words dependant for the field that depends upon another for filtering and dependee for the field that is depended upon.

1. Getting the parent control

The first step would be to climb the parent tree using a generic extension method.

/// <summary>
/// Get a parent control of T from the parent control tree of the control
/// </summary>
/// <typeparam name="T">Control of type T</typeparam>
/// <param name="control">Control to search in for control type T</param>
/// <returns>The found control of type T or null if not found</returns>
public static T GetParent<T>(this Control control) where T : Control
{
    var parentControl = control.Parent;
    while (parentControl != null)
    {
        var formView = parentControl as T;
        if (formView != null)
            return formView;
        else
            parentControl = parentControl.Parent;
    }
    return null;
}

Listing 1 – Get Parent generic extension method

I decided that a generic method was required as I had not only the DetailsView but also the FormView to deal with. The logic is simple here all that happens is that the parent of the current cointrol is cast as the T type and if it is not null then we have the control we are looking for, if it is null then the loop continues and the parent of the parent is tested and so on until a match is found or a parent is null. This get’s us the hosting control of the type we want.

2. Finding the Dependee FieldTemplate

At first I thought I could use the handy extension method FindFieldTemplate but it always returned null. So I had to go my own way and came up with this:

/// <summary>
/// Get the control by searching recursively for it.
/// </summary>
/// <param name="Root">The control to start the search at.</param>
/// <param name="Id">The ID of the control to find</param>
/// <returns>The control the was found or NULL if not found</returns>
public static Control FindDynamicControlRecursive(this Control root, string dataField)
{
    var dc = root as DynamicControl;
    if (dc != null)
    {
        if (dc.DataField == dataField)
            return dc;
    }

    foreach (Control Ctl in root.Controls)
    {
        Control FoundCtl = FindDynamicControlRecursive(Ctl, dataField);

        if (FoundCtl != null)
            return FoundCtl;
    }
    return null;
}

Listing 2 – FindDynamicControlRecusive

This is based on a function I found here How to find a control when using Master Pages the change is simple all I do is cast the control as DynamicControl and then test for null if not null then I can test the DataField which I know had the column name in it.

This however only gets us the DynamicControl next we have to extract the field which is held in the DynamicControl’s Controls collection

// Get Parent FieldTemplate
var dependeeDynamicControl = detailsView.FindDynamicControlRecursive(dependeeColumn.ColumnName) as DynamicControl;

AdvancedFieldTemplate dependeeField = null;

// setup the selection event
if (dependeeDynamicControl != null)
    dependeeField = dependeeDynamicControl.Controls[0] as AdvancedFieldTemplate;

Listing 3 – Fragment: Extracting the FieldTEmplate from the DynamicControl

Now providing that the control we are after in in slot [0] of the DynamicControl’s Controls collection we are away smile_teeth.

Note: proved to be the most difficult due to differences between DetailsView and FormView which was what my original was working with.

3. Getting an event fired on the Dependant FieldTemplate when the Dependee’s DropDownList changes

Ok for this to work we need to expose the DropDownList’s OnSelectedIndexChanged event and also the SelectedValue property, here’s the code for that in Listing 4.

public override event EventHandler SelectionChanged
{
    add
    {
        DropDownList1.SelectedIndexChanged += value;
    }
    remove
    {
        DropDownList1.SelectedIndexChanged -= value;
    }
}

public override string SelectedValue
{
    get
    {
        return DropDownList1.SelectedValue;
    }
}

Listing 4 – Exposing the OnSelectedIndexChanged event and the SelectedValue property

This is fine but when I get a copy of the control from the earlier code I need to get access to this exposed event and property. So here's how we will do that we’ll create a class that inherits

/// <summary>
/// A class to add some extra features to the standard
/// FieldTemplateUserControl
/// </summary>
public class AdvancedFieldTemplate : FieldTemplateUserControl
{
    /// <summary>
    /// Handles the adding events to the drop down list
    /// </summary>
    public virtual event EventHandler SelectionChanged
    {
        add { }
        remove { }
    }

    /// <summary>
    /// Returns the selected value of the drop down list
    /// </summary>
    public virtual string SelectedValue
    {
        get
        {
            return null;
        }
    }
}

Listing 5 – AdvancedFieldTemplate class

As you can see from Listing 5 this class inherits the FieldTemplateUserControl class the a FieldTemplate inherits, so we inherit that and then on the custom FieldTemplates we want to cascade we set them to inherit the AdvancedFieldTemplate.

Next we need an event handler to handle the event passed to this the dependant control.

protected void SelectedIndexChanged(object sender, EventArgs e)
{
    var ddl = sender as DropDownList;
    if(ddl != null)
    PopulateListControl(DropDownList1, ddl.SelectedValue);
}

Listing 6 – Event handler

4. The Attribute

Attribute have been cover a lot on this site so I’m just going to post the code and comment a very little.

[AttributeUsage(AttributeTargets.Property, Inherited = true, AllowMultiple = false)]
public class DependeeColumnAttribute : Attribute
{
    public static DependeeColumnAttribute Default = new DependeeColumnAttribute();

    public DependeeColumnAttribute() : this("") { }

    public DependeeColumnAttribute(String columnName)
    {
        ColumnName = columnName;
    }

    public String ColumnName { get; set; }
}

Listing 7 – DependeeColumnAttribute

I could of course hard coded the dependee column in to each custom FieldTemplate but of course that assumes that every time you use the FieldTEmplate the dependee column will have the same name, which is not always the case.

5. Putting it All Together

Firstly we need the extension method that get us the dependee control:

public static AdvancedFieldTemplate GetDependeeField<T>(this Control control, MetaColumn column) where T : Control
{
    // get value of dev ddl (Community)
    var detailsView = control.GetParent<T>();
    // get parent column attribute
    var dependeeColumn = column.GetAttribute<DependeeColumnAttribute>();

    if (dependeeColumn != null)
    {
        // Get Parent FieldTemplate
        var dependeeDynamicControl = detailsView.FindDynamicControlRecursive(dependeeColumn.ColumnName) as DynamicControl;

        AdvancedFieldTemplate dependeeField = null;

        // setup the selection event
        if (dependeeDynamicControl != null)
            dependeeField = dependeeDynamicControl.Controls[0] as AdvancedFieldTemplate;

        return dependeeField;
    }
    return null;
}

Listing 7 – GetDependeeField

In Listing 7 we return the FieldTemplate extracted from the found DynamicControl  so in the Page_Load event we get the dependee control and assign it the event handler so that we can capture the SelectedIndexChanged event of the dependee DropDpownList.

protected void Page_Load(object sender, EventArgs e)
{
    if (DropDownList1.Items.Count == 0)
    {
        if (!Column.IsRequired)
            DropDownList1.Items.Add(new ListItem("[Not Set]", ""));

        PopulateListControl(DropDownList1, "");
    }

    // get dependee field
    var dependeeField = this.GetDependeeField<DetailsView>(Column);

    // add event handler if dependee exists
    if (dependeeField != null)
        dependeeField.SelectionChanged += SelectedIndexChanged;
}

Listing 8 – Page_Load event

The lines in BOLD ITALIC are the added lines and demonstrates the use of GetDependeeField extension method.

protected override void OnDataBinding(EventArgs e)
{
    base.OnDataBinding(e);

    if (Mode == DataBoundControlMode.Edit)
    {
        var dependeeField = this.GetDependeeField<DetailsView>(Column);
        if (dependeeField != null)
            PopulateListControl(DropDownList1, dependeeField.SelectedValue);

        string foreignkey = ForeignKeyColumn.GetForeignKeyString(Row);
        ListItem item = DropDownList1.Items.FindByValue(foreignkey);
        if (item != null)
        {
            DropDownList1.SelectedValue = foreignkey;
        }
    }
}

Listing 9 – OnDataBinding event handler

Again in BOLD ITALIC are line are are added.

An finally some metadata

[MetadataType(typeof(Order_DetailMD))]
public partial class Order_Detail
{
    public class Order_DetailMD
    {
        public object OrderID {get;set;}
        public object ProductID {get;set;}
        public object UnitPrice {get;set;}
        public object Quantity {get;set;}
        public object Discount {get;set;}
        public object CategoryID {get;set;}
        // EntityRefs
        [DependeeColumn("Category")]
        [UIHint("Product")]
        [ColumnOrder(2)]
        public object Product {get;set;}

        [UIHint("Category")]
        [ColumnOrder(1)]
        public object Category {get;set;}
    }
}

Listing 10 – Metadata

In the attached project I've also implemented some column ordering to arrange the columns in the order that makes sense if they cascade.

There are two part to this solution which I didn’t make clear:

  1. The properties that allow a the control’s OnSelectedIndexChanges event to be captured.
  2. Finding the dependee control and capturing it’s OnSelectedIndexChanges  event and reading it’s SelectedValue.

It must be noted that if both controls implement all the features there won’t be a problem but if you do it in only the dependant control the you won’t be able to capture the OnSelectedIndexChanges event of the dependee control or read it’s SelectedValue. So you must at least implement 1. in the dependee control and 2. in the dependant control.

I hope this clarifies things.

Setting up Northwind to work with the sample

Here’s a diagram showing the changes I made to Northwind to facilitate this example (as there were no columns that fitted this scenario).

Diagram of changes to Order_Details table
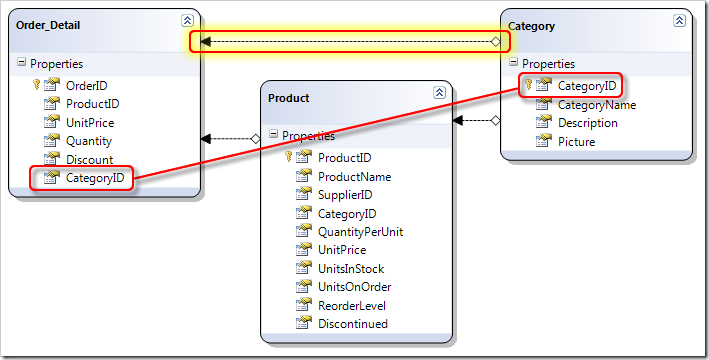
Figure 2 – Diagram of changes to Order_Details table

Added Relationship in the Model

Figure 3 – Added Relationship in the Model

And here’s the T-SQL to update the CategoryID column in Order_Details once you've added it.

USE [Northwind]
GO
UPDATE [Order Details] 
SET  [Order Details].[CategoryID] = p.[CategoryID]
FROM [Products] p 
WHERE p.[ProductID] = [Order Details].[ProductID]

SELECT * FROM [Order Details]

Listing 11 – SQL to update Oder_Details

Note: This listing is just to make changes to Northwind so it fits this scenario.

And that's it HappyWizard

Oh and the Download

Wednesday 14 January 2009

Dynamic Data – Default Value in ForeignKey Edit FieldTemplate

This article simply show how to get the DefaultValueAttribute to affect the ForeignKey Edit FieldTemplate.

So the first thing is to set some Metadata up.

[MetadataType(typeof(Order_DetailMD))]
public partial class Order_Detail
{
    public class Order_DetailMD
    {
        [DefaultValue("15")] // Genen Shouyu
        public object Product { get; set; }
    }
}

Figure 1 – Metadata

Now all we need to do is add a small amount of code to the OnDataBinding event handler of the ForeignKey Edit FieldTemplate.

protected override void OnDataBinding(EventArgs e)
{
    base.OnDataBinding(e);

    if (Mode == DataBoundControlMode.Edit)
    {
        string foreignkey = ForeignKeyColumn.GetForeignKeyString(Row);
        ListItem item = DropDownList1.Items.FindByValue(foreignkey);
        if (item != null)
        {
            DropDownList1.SelectedValue = foreignkey;
        }
    }
    // set the default value
    if (Mode == DataBoundControlMode.Insert)
    {
        var defaultValue = Column.Attributes.OfType<DefaultValueAttribute>().FirstOrDefault();
        if (defaultValue != null)
        {
            ListItem item = DropDownList1.Items.FindByValue(defaultValue.Value.ToString());
            if (item != null)
                DropDownList1.SelectedValue = defaultValue.Value.ToString();
        }
    }
}

Figure 2 – Setting the default value

Here the line in BOLD ITALIC font are to be added.

Here what happens is when the template is in Insert mode the an attempt is made to get the DefaultValueAttribute from the Column property, if this is not null then the value is retrieved and then an attempt is made at finding it in the DropDownList1 . If it is found then the drop down list is set to it.

I hope that's not too much explanation.

Thursday 8 January 2009

Good News Everyone

Yes good news indeed, I made MVP thanks to everyone who helped me along the way, now I’m up there I’ll not forget you.

Who are you and what are you doing on my blog, you think I’d recognise you it I knew you. smile_teeth

Again thanks to everyone who reads my blog and makes it worth while.

MVP-Web.jpg

Friday 2 January 2009

Dynamic Data Filtering – Installation

Introduction (see Dynamic Data Filtering home on codeplex)

 Josh Heyes created Dynamic Data Filtering because of missing features searches other that Equals and AND here are some of the filtering capabilities you can add by using Dynamic Data Filtering (Currently for Linq to SQL Dynamic Data Websites)

  • Searching ranges (ListPrice > 10 AND ListPrice < 500)
  • Searching in a list of possible values (Class in (‘L’, ‘M’))
  • Partial text searching (Color LIKE ‘B%’)
  • Not null or empty (DiscontinuedDate is not NULL)

Dynamic Data Filtering sample page

Figure 1 – Dynamic Data Filtering sample page

Articles in this series

  1. Installation & Adding Dynamic Data Filtering to your site
  2. Working with the DynamicFilterRepeater and the DynamicFilterForm
  3. Dynamic Data Filtering working with classic Filters and Filters  from Dynamic Data Futures project.
  4. Creating and adding custom filters
  5. Adding default values to filters
Note:  1 & 2 has been combined. 4. which is now 3. has been removed as this is as easy as having both sets of controls on the page :D

Installation of the Dynamic Data Filtering on codeplex.com (by Josh Heyes)

You will notice that there are several flavours of the install routine:

  • Dynamic Data Filtering Installer – Just what you’d expect it installs and adds the controls to the toolbox
  • Dynamic Data Filtering Assemblies Only – I think similar the above but does not add any samples etc.
  • Dynamic Data Filtering Installer w/o Toolbox Installer – This one is the same as the first but as the name suggests no toolbox entries this is specifically for users with Visual Web Developer 2008 Express which due to it’s cutdownness smile_wink for some reason does not like the toolbox installed, (Josh did explain on the Forum post where I read this but I can’t remember what it was or be bothered to do a big search on the Forum) so you will have to add the controls to the toolbox yourself if you have Visual Web Developer 2008 Express.

Steps to install and use in new website

  1. Download the Dynamic Data Filtering release from the releases page and save and run. 
    Dynamic Data Filtering installation progress 
    Figure 2 - Dynamic Data Filtering installation progress
  2. Then simple enough just follow the instructions.
  3. Now if you have Visual Web Developer 2008 Express you will need to add the controls to the toolbox manually.
     
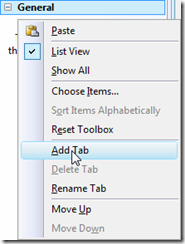
      Create a new tab in the toolbox    
      Create NewTab Rename Tab Choose Items
      Add Tab Rename Tab Browse For Controls
           
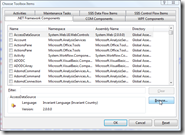
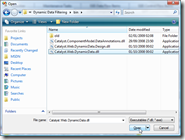
      Click Browse Navigate to Dynamic Data Filtering folder and Click Open Check all of the Catalyst controls returned
      Click Browse Navigate to Dynamic Data Filtering folder and Click Open Check all of the Catalyst controls returned
           
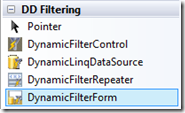
      You now see the Dynamic Data Filtering controls    
      You now see the Dynamic Data Filtering controls    
      Figures 3 – 9    
           
  4. If you installed the Dynamic Data Filtering Installer then you will have an extra Data tab created, just right click on it and select rename and then name it to say DD Filtering just to keep it the same.
  5. You’re done and ready to start using Dynamic Data Filtering.

Adding Dynamic Data Filtering to your site

Setup a Dynamic Data Website (I’m going to use a file based website  because you need to do more to get it to work, and because I tend to work with file based websites), I’m going to call it DD_Filtering.

Steps to make the List page use Dynamic Data Filtering  in place of the normal filtering.

  1. Replace the LinqDataSource with  a DynamicLinqDataSource

    Just drag the replacement DynamicLinqDataSource to the page. Remember to delete the LinqDataSource first before adding the DynamicLinqDataSource and also to set the ID os the DynamicLinqDataSource to the same ID as the LinqDataSource, ID=”GridDataSource”

    Note: When you insert the first Dynamic Data Filtering control the Dynamic Data Filtering will prompt you to install the FilterTemplate folder click yes
    Install Default Filter Templates
    Figure 10 - Install Default Filter Templates

    Delete the old LinqDataSource and then click on the new data source and set the EnableDelete property to true.

  2. Replace the FilterRepeater with DynamicFilterRepeater – This is pretty much drag the new control to the page and delete the old control. Again remember to delete the FilterRepeater before adding the DynamicFilterRepeater otherwise the DynamicFilterControl’s ID will need renaming to ID="DynamicFilter" from ID="DynamicFilter0". Also you will need to set the DataSourceID to

    DataSourceID="GridDataSource".

Next we need to do some house keeping of the FilterTemplats add when we added the first Dynamic Data Filtering control, this is specifically for file based website:

 Remove the .designer.cs files from the FilterTemplates folder

Figure 11 – Remove the .designer.cs files from the FilterTemplates folder

Next you need to edit both the .ascx and .cs files to remove namespace references that are not required for a file based website and change the CodeBehind property of the control tag to CodeFile.

Here’s the quick way to do it using Visual Studio 2008 replace in files dialogue.

Cleaning up the FilterTemplates

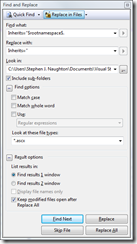
  1. Got Edit->Find and Replace->Replace in Files (or type Ctrl+Shift+H) to get the Find and Rplace in files dialogue up.
    Find and Replace in Files dialogue
    Figure 12 – Find and Replace in Files dialogue
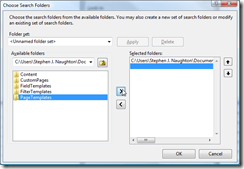
  2. Click the … button at the end of the Look in: textbox and set the selected folder to the DynamicData\FilterTemplates folder of your current website
    Select the Selected folder to the DynamicData\FilterTemplates folder
    Figure 13 – Select the Selected folder to the DynamicData\FilterTemplates folder
  3. Now in the Find what: textbox enter each of the find text and in the Replace with: the replace text, setting the appropriate Find options and file types in Look at these file types:
  4. Repeat step 3 for each row in the following table.
    Find what: Replace with: Find options Look at these file types:
    Inherits="$rootnamespace$. Inherits=" none *.ascx
    CodeBehind=" CodeFile=" none *.ascx
    namespace \$rootnamespace\$\n\{\n   Use: Regular expressions *.ascx.cs
    \}\n\} \} Use: Regular expressions *.ascx.cs

So if you set your Dynamic Data Website up correctly you could run it now, but you’d see NO filters!

This is because you must attribute up the the field that you want to be filtered. So you will now need to create a partials class file for the model you are using. Again I’m using the Northwind database.

So next we need some Metadata:

using System;
using System.Collections.Generic;
using System.Linq;
using System.Web;
using System.ComponentModel.DataAnnotations;
using System.ComponentModel;
using Catalyst.ComponentModel.DataAnnotations;

[MetadataType(typeof(OrderMD))]
public partial class Order
{
    public class OrderMD
    {
        public object OrderID { get; set; }
        public object CustomerID { get; set; }
        public object EmployeeID { get; set; }
        [Filter(FilterMode=FilterControlMode.Range)]
        public object OrderDate { get; set; }
        public object RequiredDate { get; set; }
        public object ShippedDate { get; set; }
        public object ShipVia { get; set; }
        public object Freight { get; set; }
        public object ShipName { get; set; }
        public object ShipAddress { get; set; }
        public object ShipCity { get; set; }
        public object ShipRegion { get; set; }
        public object ShipPostalCode { get; set; }
        [Filter(FilterMode=FilterControlMode.Contains)]
        public object ShipCountry { get; set; }
        // EntitySets
        public object Order_Details { get; set; }
        // EntityRefs
        [Filter(FilterMode=FilterControlMode.Equals)]
        public object Customer { get; set; }
        [Filter(FilterMode=FilterControlMode.Equals)]
        public object Employee { get; set; }
        [Filter(FilterMode=FilterControlMode.Equals)]
        public object Shipper { get; set; }
    }
}

Listing 1 – Metadata for the Orders table

Some explanation of the filter attribute should be given here:


FilterControlMode Equivalent to:
Contains WHERE [Name] Like ‘%something%’
Equals WHERE [Name] = ‘something’
MultiSelect WHERE [Name] IN (‘one, two, three’)
Range WHERE [QTY] > 5 AND [QTY] < 15


I believe in the next release there will also be a named parameter of UIHint so you can specify custom FilterTemplates.

Josh Heyes had done a really great job with this.