In this post I’m going to add row rollover and two types of row click.
- Background colour mouse rollover.
- Row click.
- Row double click.
- Add the same functionality to ListDetails.aspx
1. Background Colour Mouse Rollover
To add this feature to the List.aspx PageTemplate we need to add an event handler for the OnDataBound event.
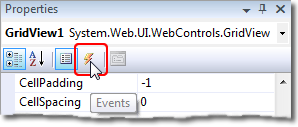
To add the event handler go to Design view of the List.aspx page click the GridView click the lightening bolt at the top the properties, this will switch to the event view of the properties.

Figure 1 - Selecting Event Properties

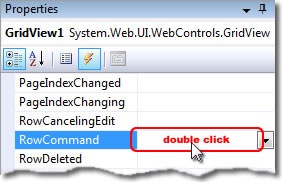
Figure 2 - Double click the blank next to the Event name
Next double click the blank space to the right of the DataBound entry and this will take you to the code behind with a new event handler method called by default GridView1_DataBound.
protected void GridView1_DataBound(object sender, EventArgs e)
{


}
Listing 1 – Empty OnDataBound event handler
Now we need to add the code that adds the rollover event to each row.
foreach (GridViewRow row in GridView1.Rows)
{
    if (row.RowType == DataControlRowType.DataRow)
    {
        // Add javascript to highlight row
        row.Attributes["onmouseover"] =
            "javascript:NAC_ChangeBackColor(this, true, '#BAD5E8'); this.style.cursor = 'hand';";
        row.Attributes["onmouseout"] = "javascript:NAC_ChangeBackColor(this, false, '');";
    }
}
Listing 2 – code to add mouse rollover
Also we need some JavaScript Listing 3 you can add this to head of the page or Master page inside some script tags or add it to an external JavaScript file and link it in the header of the page or Master page.
var lastColorUsed;
function NAC_ChangeBackColor(row, highlight, RowHighlightColor)
{
    if (highlight)
    {
        // set the background colour
        lastColorUsed = row.style.backgroundColor;
        row.style.backgroundColor = RowHighlightColor;
    }
    else
    {
        // restore the colour
        row.style.backgroundColor = lastColorUsed;
    }
}
Listing 3 – Rollover helper JavaScript
2. Row click
If we want to add clicking the row to our project we will need to change the buttons in the GridView’s Columns –> TemplateField collection. Listing 4 shows how the buttons need to be changed:
<Columns> <asp:TemplateField> <ItemTemplate> <asp:HyperLink ID="EditHyperLink" runat="server" NavigateUrl='<%# table.GetActionPath(PageAction.Edit, GetDataItem()) %>' Text="Edit" /> <asp:LinkButton ID="DeleteLinkButton" runat="server" CommandName="Delete" CausesValidation="false" Text="Delete" OnClientClick='return confirm("Are you sure you want to delete this item?");'/> <asp:HyperLink ID="DetailsHyperLink" runat="server" NavigateUrl='<%# table.GetActionPath(PageAction.Details, GetDataItem()) %>' Text="Details" /> </ItemTemplate> </asp:TemplateField> </Columns>
<Columns>
    <asp:TemplateField>
        <ItemTemplate>
            <asp:LinkButton
                ID="LinkButton1"
                runat="server"
                CommandName="Edit"
                CommandArgument='<%# table.GetActionPath(PageAction.Edit, GetDataItem()) %>'
                CausesValidation="true"
                Text="Edit"/>
            <asp:LinkButton
                ID="DeleteLinkButton"
                runat="server"
                CommandName="Delete"
                CausesValidation="false"
                Text="Delete"
                OnClientClick='return confirm("Are you sure you want to delete this item?");'/>
            <asp:LinkButton
                ID="LinkButton2"
                runat="server"
                CommandName="Details"
                CommandArgument='<%# table.GetActionPath(PageAction.Details, GetDataItem()) %>'
                Text="Details"/>
        </ItemTemplate>
    </asp:TemplateField>
</Columns>
Listing 4 – changing the two HyperLink’s to LinkButtons
As we did above add an event handler for RowCommand OnRowCommand event see Listing 5 for the code to add to the interior.
protected void GridView1_RowCommand(object sender, GridViewCommandEventArgs e)
{
    String commandName = e.CommandName.ToLower();
    if (commandName == "edit" || commandName == "details")
        Response.Redirect(e.CommandArgument.ToString());
}
Listing 5 – OnRowCommand event handler
What we have done in Listings 4 & 5 is move the functionality of the HyperLink to the code behind. Now Listing 5 just checks to make sure it’s a command we want to handle and then call the URL passed in the CommandArgument. Now we have restored the Hyperlink’s original functionality.
Now that we have changed the HyperLink control to LinkButton we can add the code that implements row click functionality. For this we will need to edit the GridView1_DataBound event handler and add the code in Listing 6 just after the last row.Attributes.
foreach (Control c in row.Cells[0].Controls)
{
    if (c is LinkButton)
    {
        LinkButton selectButton = (LinkButton)c;

        // Get the javascript which is assigned to this LinkButton
        String jsClick = ClientScript.GetPostBackClientHyperlink(selectButton, "");

        // Get command name in lowercase
        String commandName = selectButton.CommandName.ToLower();

        // Add this javascript to the onclick Attribute of the row
        if (commandName == "details")
        {
            row.Attributes["onclick"] = jsClick;
            selectButton.Visible = false;
        }


    }
}
Listing 6 – code to cycle through the rows and add the on click event code
If you run this as it is you will get an “Invalid postback or callback argument” error (but that will be hidden because of EnablePartialRendering in the Site.Master page is enabled) to overcome this we need to register the all the row click events for event validation by calling RegisterForEventValidation on each one see Listing 7 for the code.
// Register the dynamically created client scripts
protected override void Render(HtmlTextWriter writer)
{
    // The client scripts for gvReleased were created in gvReleased_RowDataBound
    foreach (GridViewRow row in GridView1.Rows)
    {
        if (row.RowType == DataControlRowType.DataRow)
        {
            // validate the controls event
            foreach (Control c in row.Cells[0].Controls)
            {
                if (c is LinkButton)
                {
                    // get link button
                    LinkButton selectButton = (LinkButton)c;

                    if (selectButton.CommandName.ToLower() == "details")
                        Page.ClientScript.RegisterForEventValidation(selectButton.UniqueID);
                }
            }
        }
    }
    base.Render(writer);
}
Listing 7 – validate the controls event
So now we have rollover and click working :D
3. Row double click.
Next and this bit is a bit tricky as we add the extra bits to handle double click.
protected void GridView1_DataBound(object sender, EventArgs e)
{
    foreach (GridViewRow row in GridView1.Rows)
    {
        if (row.RowType == DataControlRowType.DataRow)
        {
            // Add javascript to highlight row
            row.Attributes["onmouseover"] =
               "javascript:NAC_ChangeBackColor(this, true, '#BAD5E8'); this.style.cursor = 'hand';";
            row.Attributes["onmouseout"] = "javascript:NAC_ChangeBackColor(this, false, '');";

            foreach (Control c in row.Cells[0].Controls)
            {
                if (c is LinkButton)
                {
                    LinkButton selectButton = (LinkButton)c;

                    // Get the javascript which is assigned to this LinkButton
                    String jsClick = ClientScript.GetPostBackClientHyperlink(selectButton, "");

                    // Get command name in lowercase
                    String commandName = selectButton.CommandName.ToLower();

                    // Add this javascript to the onclick Attribute of the row
                    if (commandName == "details")
                        row.Attributes["onclick"] = "NAC_StartSingleClick(\"" + jsClick + "\");";

                    // Add this javascript to the ondblclick Attribute of the row
                    if (commandName == "edit")
                        row.Attributes["ondblclick"] = "NAC_StartDblClick(\"" + jsClick + "\");";

                    // set the link button to be invisible
                    if (commandName == "details" || commandName == "edit")
                        selectButton.Visible = false;
                }
            }
        }
    }
}
Listing 8 – final OnDataBound event handler
var NAC_TimeoutId = null;

function NAC_StartSingleClick(event)
{
    NAC_TimeoutId = setTimeout(event, 200);
}

function NAC_StartDblClick(event)
{
    window.clearTimeout(NAC_TimeoutId);
    setTimeout(event, 1);
}
Listing 9 – JavaScript functions to stop conflicts with double and single click events
In Listing 8 we altered the row.Attributes assignment to NAC_StartSingleClick(\"" + jsClick + "\"); so instead of calling the event directly it now goes through a launch function (see Listing 9 for details) in both function listed in Listing 9 the passed in button functions are surrounded with a setTimeout function one with a timeout of 200ms and the other 1ms; this is so that when you double click the NAC_StartDblClick has time to clear the waiting single click before it is actioned. This overcomes the click - double click conflict.
And also modify the OnRender event handler to deal with the edit button also.
// Register the dynamically created client scripts
protected override void Render(HtmlTextWriter writer)
{
    foreach (GridViewRow row in GridView1.Rows)
    {
        if (row.RowType == DataControlRowType.DataRow)
        {
            // validate the controls event
            foreach (Control c in row.Cells[0].Controls)
            {
                if (c is LinkButton)
                {
                    // Get linkbutton
                    LinkButton selectButton = (LinkButton)c;

                    // Get command name in lowercase
                    String commandName = selectButton.CommandName.ToLower();

                    if (commandName == "edit" || commandName == "details")
                        Page.ClientScript.RegisterForEventValidation(selectButton.UniqueID);
                }
            }
        }
    }
    base.Render(writer);
}
Listing 10 – final OnRender event handler
The OnRender event now handles both buttons click and double click.
Now if you click anywhere on the row you get redirected to the Details page and if you double click you get redirected to the Edit page.
4. Add the same functionality to ListDetails.aspx
For completeness here are the changes to the ListDetails.aspx if you are using it.
<Columns>
    <asp:TemplateField>
        <ItemTemplate>
            <asp:LinkButton
                ID="LinkButton2"
                runat="server"
                CommandName="Select"
                Text="Select"/>
            <asp:LinkButton
                ID="LinkButton1"
                runat="server"
                CommandName="Edit"
                CausesValidation="true"
                Text="Edit"/>
            <asp:LinkButton
                ID="DeleteLinkButton"
                runat="server"
                CommandName="Delete"
                CausesValidation="false"
                Text="Delete"
                OnClientClick='return confirm("Are you sure you want to delete this item?");'/>
        </ItemTemplate>
    </asp:TemplateField>
</Columns>
Listing 11 – changed to the ListDetails.aspx GridView1 columns collection
protected void GridView1_DataBound(object sender, EventArgs e)
{
    if (GridView1.Rows.Count == 0)
    {
        DetailsView1.ChangeMode(DetailsViewMode.Insert);
    }

    foreach (GridViewRow row in GridView1.Rows)
    {
        if (row.RowType == DataControlRowType.DataRow)
        {
            // Add javascript to highlight row
            row.Attributes["onmouseover"] =
                "javascript:NAC_ChangeBackColor(this, true, '#BAD5E8'); this.style.cursor = 'hand';";
            row.Attributes["onmouseout"] = "javascript:NAC_ChangeBackColor(this, false, '');";

            foreach (Control c in row.Cells[0].Controls)
            {
                if (c is LinkButton)
                {
                    LinkButton selectButton = (LinkButton)c;

                    // Get the javascript which is assigned to this LinkButton
                    String jsClick = ClientScript.GetPostBackClientHyperlink(selectButton, "");

                    // Get command name in lowercase
                    String commandName = selectButton.CommandName.ToLower();

                    // Add this javascript to the onclick Attribute of the row
                    if (commandName == "select")
                        row.Attributes["onclick"] =  "NAC_StartSingleClick(\"" + jsClick + "\");";

                    // Add this javascript to the ondblclick Attribute of the row
                    if (commandName == "edit")
                        row.Attributes["ondblclick"] = "NAC_StartDblClick(\"" + jsClick + "\");";

                    // set the link button to be invisible
                    if (commandName == "select" || commandName == "edit")
                        selectButton.Visible = false;
                }
            }
        }
    }
}

// Register the dynamically created client scripts
protected override void Render(HtmlTextWriter writer)
{
    // The client scripts for gvReleased were created in gvReleased_RowDataBound
    foreach (GridViewRow row in GridView1.Rows)
    {
        if (row.RowType == DataControlRowType.DataRow)
        {
            // validate the controls event
            foreach (Control c in row.Cells[0].Controls)
            {
                if (c is LinkButton)
                {
                    // Get linkbutton
                    LinkButton selectButton = (LinkButton)c;

                    // Get command name in lowercase
                    String commandName = selectButton.CommandName.ToLower();

                    if (commandName == "edit" || commandName == "select")
                        Page.ClientScript.RegisterForEventValidation(selectButton.UniqueID);
                }
            }
        }
    }
    base.Render(writer);
}
Listing 12 – the additional code to be added to the ListDetails.aspx.cs code behind file
Here the single click activates Select and the double click activates Edit.
Happy coding ![]()
9 comments:
How can this customization can be inherited in my CustomPages\List.aspx
I want the same look and feel for all of my grids that's why I think of it and I don't want to re-code these on all of my custom pages.
I followed some tutorial on making custom pages and try to manipulate it.
< % @ Page Language="C#" MasterPageFile="~/Site.master" CodeFile="~/DynamicData/PageTemplates/List.aspx.cs"
CodeBehind="~/DynamicData/PageTemplates/List.aspx.cs" Inherits="DynamicData.List" % >
as coded on my CustomPage\List.aspx
I changed the CodeFile and CodeBehind pointing to its correct file. Inherits, is the partial class of my pagetemplates.
My Custom List Page is just aspx file, (no designer and cs include, I deleted it)
Thanks...
Please help....
The DELETE COMMAND here works same as the SINGLE CLICK.. Please check!!!
The DELETE COMMAND works same as SINGLE CLICK. Please check!!!!
Thanks
Hi Steve,
Thank you very much for a great post on Row manipulation in DD!!!
no problem :)
Steve
Thanks a bunch - I needed to tweak it a bit for the custom needs of my app, but it was the starting point I was looking for.
Your welcome Brad
Steve :)
I used this on a grid view that returns a few thousand rows and the roll over breaks (snail speed) in IE. Works great in Opera, Firefox, Safari, and Chrome. Anyone else have this issue?
What veriosn of IE?
Steve
Post a Comment