Showing posts with label GridView. Show all posts

Saturday, 24 July 2010

Conditional Row Highlighting in Dynamic Data

There are occasions when you want to highlight a row in the GridView (I usually want this based on a Boolean field) so here’s what you do.

First of all we need some way of telling the column to do this an I usually use an attribute see Listing 1 it have two properties one for the value when we want the CSS class to be applied, and the other the CSS class to apply.

[AttributeUsage(AttributeTargets.Property | AttributeTargets.Field, AllowMultiple = false)]
public class RowHighlightingAttribute : Attribute
{
    /// <summary>
    /// Initializes a new instance of the <see cref="RowHighlightingAttribute"/> class.
    /// </summary>
    /// <param name="valueWhenTrue">The value when true.</param>
    /// <param name="cssClass">The CSS class.</param>
    public RowHighlightingAttribute(String valueWhenTrue, String cssClass)
    {
        ValueWhenTrue = valueWhenTrue;
        CssClass = cssClass;
    }

    /// <summary>
    /// Gets or sets the value when true.
    /// </summary>
    /// <value>The value when true.</value>
    public String ValueWhenTrue { get; set; }

    /// <summary>
    /// Gets or sets the CSS class.
    /// </summary>
    /// <value>The CSS class.</value>
    public String CssClass { get; set; }
}

Listing 1 – RowHighlightingAttribute

Next we need a way of applying the CSS class based on the condition, see Listing 2.

/// <summary>
/// Highlights the row.
/// </summary>
/// <param name="fieldTemplate">The field template.</param>
public static void HighlightRow(this FieldTemplateUserControl fieldTemplate)
{
    // get the attribute
    var rowHighlighting = fieldTemplate.MetadataAttributes.GetAttribute<RowHighlightingAttribute>();
    // make sure the attribute is not null
    if (rowHighlighting != null)
    {
        // get the GridViewRow, note this will not
        // be present in a DetailsView.
        var parentRow = fieldTemplate.GetContainerControl<GridViewRow>();
        if (parentRow != null 
            && rowHighlighting.ValueWhenTrue == fieldTemplate.FieldValueString)
        {
            // apply the CSS class appending if a class is already applied.
            if (String.IsNullOrWhiteSpace(parentRow.CssClass))
                parentRow.CssClass += " " + rowHighlighting.CssClass;
            else
                parentRow.CssClass = rowHighlighting.CssClass;
        }
    }
}

Listing 2 – HighlightRow extension method

Now to add the extension method to a field template, we will apply it to the Boolean read-only field template.

protected override void OnDataBinding(EventArgs e)
{
    base.OnDataBinding(e);

    object val = FieldValue;
    if (val != null)
        CheckBox1.Checked = (bool)val;

    // apply highlighting
    this.HighlightRow();
}

Listing 3 – Apply highlighting.

For the sample I’ve also added it to the Text.ascx.cs field template.

Adding some attributes

Metadata applied

Figure 1 - Metadata applied

You could also us this technique on other values, but this will do for this sample.

Row Highlighting applied

Figure 2 – Row Highlighting applied.

So you can see with a little bit of work you can add conditional row level highlighting to Dynamic Data.

Download

Saturday, 30 May 2009

Move Command Link Column to End Column – Dynamic Data

Whilst answering this question Move Edit, Details, Delete (col 0) to the Rightmost column of table on the Dynamic Data Forum I found this had been answered before (Move GridView command column or dynamically append columns) and decided to post it to my blog in full for easy access.

The post suggest using IAutoFieldGenerator to add the command column to the end like this:

public ICollection GenerateFields(Control control)
{
    // Get all of table's columns, take only the ones that should be automatically included in a fields collection,
    // sort the result by the ColumnOrderAttribute, and for each column create a DynamicField
    var fields = from column in _table.Columns
                 where IncludeField(column)
                 orderby ColumnOrdering(column), column.Name
                 select new DynamicField()
                 {
                     DataField = column.Name,
                     HeaderText = column.DisplayName
                 };

    List<DynamicField> flds = fields.ToList();
    if (_table.PrimaryKeyColumns.Count > 0)
    {
        // get the first primary key field                
        DynamicField ctrl = new DynamicField();
        ctrl.HeaderText = "Commands";
        ctrl.DataField = _table.PrimaryKeyColumns[0].Name;
        ctrl.UIHint = "GridCommand";
        flds.Add(ctrl);
    }

    return flds;
}

Listing 1 – GenerateFields method of the IAutoFieldGenerator

The main change to my usual IAutoFieldGenerator is shown in Bold Italic this works by only adding the GridCommand FieldTemplate if the table a=has a Primary Key.

<asp:HyperLink 
    ID="EditHyperLink" 
    runat="server" 
    NavigateUrl='<%# Table.GetActionPath(PageAction.Edit, Row) %>' 
    Text="Edit" />
&nbsp;
<asp:LinkButton 
    ID="DeleteLinkButton" 
    runat="server" 
    CommandName="Delete" 
    CausesValidation="false" 
    Text="Delete" 
    OnClientClick='return confirm("Are you sure you want to delete this item?");' />
&nbsp;
<asp:HyperLink 
    ID="DetailsHyperLink" 
    runat="server" 
    NavigateUrl='<%# Table.GetActionPath(PageAction.Details, Row) %>' 
    Text="Details" />

Listing 2 – GridCommand FieldTemplate

In Listing 2 we see the GridCommand FieldTemplate layed out neatly (you may need to tidy it so that it is similar to the section it is copied form in the List page. >&nbsp;<)

Download

The download contains the full IAutoFieldGenerator and GridCommand FieldTemplate plus Column sort capability.

Friday, 15 May 2009

Remembering Page Index when returning to a List Page

This article is a continuation of the previous Retaining Pager Size in Dynamic Data GridViewPager now we want to retain the page index when moving between pages. For this we will use AJAX History.

Note: Also see this article back in February AJAX History in a Dynamic Data Website

I won’t go over the AJAX History in detail as Mike Ormond has done a great video on it on MSDN Screencasts here Managing Browser History with ASP.NET AJAX and the ASP.NET 3.5 Extensions Preview.

So let’s start.

Fist we will add a global private variable  to hold a reference to the ScriptManager.

private ScriptManager _scriptManager;

Next we need to initialise a few things

/// <summary>
/// Handles the Init event of the Page control.
/// </summary>
/// <param name="sender">The source of the event.</param>
/// <param name="e">
/// The <see cref="System.EventArgs"/> instance 
/// containing the event data.
/// </param>
protected void Page_Init(object sender, EventArgs e)
{
    // get the containing GridView
    _gridView = this.GetParentOfType<GridView>();
    if (_gridView != null)
    {
        // add event to GridView to collect page index changed
        _gridView.PageIndexChanged += GridViewPageIndexChanged;

        // get the datasource on the gridview
        var GridDataSource = _gridView.FindDataSourceControl();
        
        // get the table
        _table = GridDataSource.GetTable();

        // Add OnNavigate handler to restore History points.
        _scriptManager = ScriptManager.GetCurrent(Page);
        if (_scriptManager != null)
            // add the navigate handler
            _scriptManager.Navigate += ScriptManagerOnNavigate;
    }
}

Listing 1 – Page_Init for the GridViewPager

In Listing 1 we get the GridView and ScriptManger, we then add a handler for the PageIndexChanged event on the GridView and add an event handler for the Navigate event of the ScriptManager.

/// <summary>
/// Grids the view page index changed.
/// </summary>
/// <param name="sender">The sender.</param>
/// <param name="e">
/// The <see cref="System.EventArgs"/> 
/// instance containing the event data.
/// </param>
protected void GridViewPageIndexChanged(object sender, EventArgs e)
{
    // add history point
    if (_scriptManager != null)
        _scriptManager.AddHistoryPoint("PageIndex", _gridView.PageIndex.ToString());
}

/// <summary>
/// Scripts the manager on navigate.
/// </summary>
/// <param name="sender">The sender.</param>
/// <param name="e">
/// The <see cref="System.Web.UI.HistoryEventArgs"/> 
/// instance containing the event data.
/// </param>
protected void ScriptManagerOnNavigate(object sender, HistoryEventArgs e)
{
    // restore history point
    if (!String.IsNullOrEmpty(e.State["PageIndex"]))
        _gridView.PageIndex = int.Parse(e.State["PageIndex"]);
}

Listing 2 – Handlers for the PageIndexChanged and Navigate events

Updated: Removed HistoryPointValue = e.State["PageIndex"]; not required. I think HistoryPointValue was originally a global private member variable.

In Listing 2 we are adding history points and restoring them again we also add a history point in Listing 3 if the page index TextBox is changed.

protected void TextBoxPage_TextChanged(object sender, EventArgs e)
{
    if (_gridView == null)
        return;

    int page;
    if (int.TryParse(TextBoxPage.Text.Trim(), out page))
    {
        if (page <= 0)
            page = 1;
        if (page > _gridView.PageCount)
            page = _gridView.PageCount;
        _gridView.PageIndex = page - 1;

        // add history point
        if (_scriptManager != null)
            _scriptManager.AddHistoryPoint("PageIndex", _gridView.PageIndex.ToString());
    }
    TextBoxPage.Text = (_gridView.PageIndex + 1).ToString();
}

Listing 3 – Changes to the TextBoxPage_TextChanged event handler

And that is pretty much it HappyWizard

Saturday, 6 September 2008

Dynamic Data and Field Templates - An Advanced FieldTemplate with a GridView/DetailsView Project ***UPDATED***

  1. The Anatomy of a FieldTemplate.
  2. Your First FieldTemplate.
  3. An Advanced FieldTemplate.
  4. A Second Advanced FieldTemplate.
  5. An Advanced FieldTemplate with a GridView.
  6. An Advanced FieldTemplate with a DetailsView.
  7. An Advanced FieldTemplate with a GridView/DetailsView Project.

Here is the file based website zipped up no Northwind database you’ll need to provide that yourself as I’m on SQL Server 2008 now :D

UPDATED: I’ve updated the GridView/DetailsView Project it now has ParentDetails and the ChildrenGrid FieldTemplate’s
ParentDetails
no longet support Insert but does support Update as before. Before you try it test it with the Northwind database and this project.

Changes to the project both FieldTemplate now support an attribute that sets which columns to display and now share the IAutoFieldGenerator.

Hope this helps [:D]

Saturday, 9 August 2008

Customising GridView for Row Rollover and Click in Dynamic Data ***UPDATED***

In this post I’m going to add row rollover and two types of row click.

  1. Background colour mouse rollover.
  2. Row click.
  3. Row double click.
  4. Add the same functionality to ListDetails.aspx

1. Background Colour Mouse Rollover

To add this feature to the List.aspx PageTemplate we need to add an event handler for the OnDataBound event.

To add the event handler go to Design view of the List.aspx page click the GridView click the lightening bolt at the top the properties, this will switch to the event view of the properties.
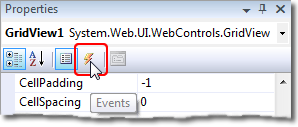
Selecting Event Properties

Figure 1 - Selecting Event Properties
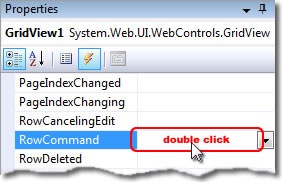
 Double click the blank next to the Event name

Figure 2 - Double click the blank next to the Event name

Next double click the blank space to the right of the DataBound entry and this will take you to the code behind with a new event handler method called by default GridView1_DataBound.

protected void GridView1_DataBound(object sender, EventArgs e)
{


}

Listing 1 – Empty OnDataBound event handler

Now we need to add the code that adds the rollover event to each row.

foreach (GridViewRow row in GridView1.Rows)
{
    if (row.RowType == DataControlRowType.DataRow)
    {
        // Add javascript to highlight row
        row.Attributes["onmouseover"] = 
"javascript:NAC_ChangeBackColor(this, true, '#BAD5E8'); this.style.cursor = 'hand';"; row.Attributes["onmouseout"] = "javascript:NAC_ChangeBackColor(this, false, '');";
}
}

Listing 2 – code to add mouse rollover

Note: The this.style.cursor = 'hand'; code  in the above OnMouseOver JavaScript event handler is there simply to change the cursor to the hand :D

Also we need some JavaScript Listing 3 you can add this to head of the page or Master page inside some script tags or add it to an external JavaScript file and link it in the header of the page or Master page.

var lastColorUsed;
function NAC_ChangeBackColor(row, highlight, RowHighlightColor)
{
    if (highlight)
    {
        // set the background colour
        lastColorUsed = row.style.backgroundColor;
        row.style.backgroundColor = RowHighlightColor;
    }
    else
    {
        // restore the colour
        row.style.backgroundColor = lastColorUsed;
    }
}

Listing 3 – Rollover helper JavaScript

Note: If you add the code to an external JavaScript file and link to it in the Master page then you will need to alter the path as the Page templates are off the root in DynamicData\PageTemplates\ I found the adding “../” to the beginning of the path worked fine in the standard Dynamic Data file based website.

2. Row click

If we want to add clicking the row to our project we will need to change the buttons in the GridView’s Columns –> TemplateField collection. Listing 4 shows how the buttons need to be changed:

<Columns>
    <asp:TemplateField>
        <ItemTemplate>
            <asp:HyperLink 
                ID="EditHyperLink" 
                runat="server"
                NavigateUrl='<%# table.GetActionPath(PageAction.Edit, GetDataItem()) %>'
                Text="Edit" />
                &nbsp;
            <asp:LinkButton 
                ID="DeleteLinkButton" 
                runat="server" 
                CommandName="Delete"
                CausesValidation="false" 
                Text="Delete"
                OnClientClick='return confirm("Are you sure you want to delete this item?");'/>
                &nbsp;
            <asp:HyperLink 
                ID="DetailsHyperLink" 
                runat="server"
                NavigateUrl='<%# table.GetActionPath(PageAction.Details, GetDataItem()) %>'
                Text="Details" />
        </ItemTemplate>
    </asp:TemplateField>
</Columns>

Change to:

<Columns>
    <asp:TemplateField>
        <ItemTemplate>
            <asp:LinkButton 
                ID="LinkButton1" 
                runat="server" 
                CommandName="Edit"
                CommandArgument='<%# table.GetActionPath(PageAction.Edit, GetDataItem()) %>'
                CausesValidation="true" 
                Text="Edit"/>
            <asp:LinkButton 
                ID="DeleteLinkButton" 
                runat="server" 
                CommandName="Delete"
                CausesValidation="false" 
                Text="Delete"
                OnClientClick='return confirm("Are you sure you want to delete this item?");'/>
            <asp:LinkButton 
                ID="LinkButton2" 
                runat="server" 
                CommandName="Details"
                CommandArgument='<%# table.GetActionPath(PageAction.Details, GetDataItem()) %>'
                Text="Details"/>
        </ItemTemplate>
    </asp:TemplateField>
</Columns>

Listing 4 – changing the two HyperLink’s to LinkButtons

As we did above add an event handler for RowCommand OnRowCommand event see Listing 5 for the code to add to the interior.

protected void GridView1_RowCommand(object sender, GridViewCommandEventArgs e)
{
    String commandName = e.CommandName.ToLower();
    if (commandName == "edit" || commandName == "details")
        Response.Redirect(e.CommandArgument.ToString());
}

Listing 5 – OnRowCommand event handler

What we have done in Listings 4 & 5 is move the functionality of the HyperLink to the code behind. Now Listing 5 just checks to make sure it’s a command we want to handle and then call the URL passed in the CommandArgument. Now we have restored the Hyperlink’s original functionality.

Now that we have changed the HyperLink control to LinkButton we can add the code that implements row click functionality. For this we will need to edit the GridView1_DataBound event handler and add the code in Listing 6 just after the last row.Attributes.

foreach (Control c in row.Cells[0].Controls)
{
    if (c is LinkButton)
    {
        LinkButton selectButton = (LinkButton)c;

        // Get the javascript which is assigned to this LinkButton
        String jsClick = ClientScript.GetPostBackClientHyperlink(selectButton, "");

        // Get command name in lowercase
        String commandName = selectButton.CommandName.ToLower();

        // Add this javascript to the onclick Attribute of the row
        if (commandName == "details")
{ row.Attributes["onclick"] = jsClick; selectButton.Visible = false;
}


} }

Listing 6 – code to cycle through the rows and add the on click event code

If you run this as it is you will get an “Invalid postback or callback argument” error (but that will be hidden because of EnablePartialRendering  in the Site.Master page is enabled) to overcome this we need to register the all the row click events for event validation by calling RegisterForEventValidation on each one see Listing 7 for the code.

// Register the dynamically created client scripts
protected override void Render(HtmlTextWriter writer)
{
    // The client scripts for gvReleased were created in gvReleased_RowDataBound
    foreach (GridViewRow row in GridView1.Rows)
    {
        if (row.RowType == DataControlRowType.DataRow)
        {
            // validate the controls event
            foreach (Control c in row.Cells[0].Controls)
            {
                if (c is LinkButton)
                {
                    // get link button
                    LinkButton selectButton = (LinkButton)c;

                    if (selectButton.CommandName.ToLower() == "details")
                        Page.ClientScript.RegisterForEventValidation(selectButton.UniqueID);
                }
            }
        }
    }
    base.Render(writer);
}

Listing 7 – validate the controls event

So now we have rollover and click working :D

3. Row double click.

Next and this bit is a bit tricky as we add the extra bits to handle double click.

protected void GridView1_DataBound(object sender, EventArgs e)
{
    foreach (GridViewRow row in GridView1.Rows)
    {
        if (row.RowType == DataControlRowType.DataRow)
        {
            // Add javascript to highlight row
            row.Attributes["onmouseover"] = 
"javascript:NAC_ChangeBackColor(this, true, '#BAD5E8'); this.style.cursor = 'hand';"; row.Attributes["onmouseout"] = "javascript:NAC_ChangeBackColor(this, false, '');"; foreach (Control c in row.Cells[0].Controls) { if (c is LinkButton) { LinkButton selectButton = (LinkButton)c; // Get the javascript which is assigned to this LinkButton String jsClick = ClientScript.GetPostBackClientHyperlink(selectButton, ""); // Get command name in lowercase String commandName = selectButton.CommandName.ToLower(); // Add this javascript to the onclick Attribute of the row if (commandName == "details") row.Attributes["onclick"] = "NAC_StartSingleClick(\"" + jsClick + "\");"; // Add this javascript to the ondblclick Attribute of the row if (commandName == "edit") row.Attributes["ondblclick"] = "NAC_StartDblClick(\"" + jsClick + "\");"; // set the link button to be invisible if (commandName == "details" || commandName == "edit") selectButton.Visible = false; } } } } }

Listing 8 – final OnDataBound event handler

var NAC_TimeoutId = null;

function NAC_StartSingleClick(event)
{
    NAC_TimeoutId = setTimeout(event, 200);
}

function NAC_StartDblClick(event)
{
    window.clearTimeout(NAC_TimeoutId);
    setTimeout(event, 1);
}

Listing 9 – JavaScript functions to stop conflicts with double and single click events

In Listing 8 we altered the row.Attributes assignment to NAC_StartSingleClick(\"" + jsClick + "\"); so instead of calling the event directly it now goes through a launch function (see Listing 9 for details) in both function listed in Listing 9 the passed in button functions are surrounded with a setTimeout function one with a timeout of 200ms and the other 1ms; this is so that when you double click the NAC_StartDblClick has time to clear the waiting single click before it is actioned. This overcomes the click - double click conflict.

And also modify the OnRender event handler to deal with the edit button also.

// Register the dynamically created client scripts
protected override void Render(HtmlTextWriter writer)
{
    foreach (GridViewRow row in GridView1.Rows)
    {
        if (row.RowType == DataControlRowType.DataRow)
        {
            // validate the controls event
            foreach (Control c in row.Cells[0].Controls)
            {
                if (c is LinkButton)
                {
                    // Get linkbutton
                    LinkButton selectButton = (LinkButton)c;

                    // Get command name in lowercase
                    String commandName = selectButton.CommandName.ToLower();

                    if (commandName == "edit" || commandName == "details")
                        Page.ClientScript.RegisterForEventValidation(selectButton.UniqueID);
                }
            }
        }
    }
    base.Render(writer);
}

Listing 10 – final OnRender event handler

The OnRender event now handles both buttons click and double click.

Now if you click anywhere on the row you get redirected to the Details page and if you double click you get redirected to the Edit page.

4. Add the same functionality to ListDetails.aspx

For completeness here are the changes to the ListDetails.aspx if you are using it.

<Columns>
    <asp:TemplateField>
        <ItemTemplate>
            <asp:LinkButton 
                ID="LinkButton2" 
                runat="server" 
                CommandName="Select"
                Text="Select"/>
            <asp:LinkButton 
                ID="LinkButton1" 
                runat="server" 
                CommandName="Edit"
                CausesValidation="true" 
                Text="Edit"/>
            <asp:LinkButton 
                ID="DeleteLinkButton" 
                runat="server" 
                CommandName="Delete"
                CausesValidation="false" 
                Text="Delete"
                OnClientClick='return confirm("Are you sure you want to delete this item?");'/>
        </ItemTemplate>
    </asp:TemplateField>
</Columns>

Listing 11 – changed to the ListDetails.aspx GridView1 columns collection

Note: Don’t forget to update GridView1 with the OnDataBound="GridView1_DataBound" event handler to link it up with the code behind.
protected void GridView1_DataBound(object sender, EventArgs e)
{
    if (GridView1.Rows.Count == 0)
    {
        DetailsView1.ChangeMode(DetailsViewMode.Insert);
    }

    foreach (GridViewRow row in GridView1.Rows)
    {
        if (row.RowType == DataControlRowType.DataRow)
        {
            // Add javascript to highlight row
            row.Attributes["onmouseover"] = 
"javascript:NAC_ChangeBackColor(this, true, '#BAD5E8'); this.style.cursor = 'hand';"; row.Attributes["onmouseout"] = "javascript:NAC_ChangeBackColor(this, false, '');"; foreach (Control c in row.Cells[0].Controls) { if (c is LinkButton) { LinkButton selectButton = (LinkButton)c; // Get the javascript which is assigned to this LinkButton String jsClick = ClientScript.GetPostBackClientHyperlink(selectButton, ""); // Get command name in lowercase String commandName = selectButton.CommandName.ToLower(); // Add this javascript to the onclick Attribute of the row if (commandName == "select") row.Attributes["onclick"] = "NAC_StartSingleClick(\"" + jsClick + "\");"; // Add this javascript to the ondblclick Attribute of the row if (commandName == "edit") row.Attributes["ondblclick"] = "NAC_StartDblClick(\"" + jsClick + "\");"; // set the link button to be invisible if (commandName == "select" || commandName == "edit") selectButton.Visible = false; } } } } } // Register the dynamically created client scripts protected override void Render(HtmlTextWriter writer) { // The client scripts for gvReleased were created in gvReleased_RowDataBound foreach (GridViewRow row in GridView1.Rows) { if (row.RowType == DataControlRowType.DataRow) { // validate the controls event foreach (Control c in row.Cells[0].Controls) { if (c is LinkButton) { // Get linkbutton LinkButton selectButton = (LinkButton)c; // Get command name in lowercase String commandName = selectButton.CommandName.ToLower(); if (commandName == "edit" || commandName == "select") Page.ClientScript.RegisterForEventValidation(selectButton.UniqueID); } } } } base.Render(writer); }

Listing 12 – the additional code to be added to the ListDetails.aspx.cs code behind file

Here the single click activates Select and the double click activates Edit.

Note: This could be added the to the GridView_Edit FieldTemplate I did here An Advanced FieldTemplate with a GridView.

Happy coding smile_teeth

Thursday, 7 August 2008

Dynamic Data and Field Templates - An Advanced FieldTemplate with a GridView ***UPDATED 2008/09/24***

  1. The Anatomy of a FieldTemplate.
  2. Your First FieldTemplate.
  3. An Advanced FieldTemplate.
  4. A Second Advanced FieldTemplate.
  5. An Advanced FieldTemplate with a GridView.
  6. An Advanced FieldTemplate with a DetailsView.
  7. An Advanced FieldTemplate with a GridView/DetailsView Project.

The Idea for this FieldTemplate came from Nigel Basel post on the Dynamic Data forum where he said he needed to have a GridView emended in another data control i.e. FormView so he could use the AjaxToolkit Tab control. So here it is with some explanation.

Files Required for Project

In this project we are going to convert a PageTemplate into a FieldTemplate so in your project you will need to copy the List.aspx and it’s code behind List.aspx.cs to the FieldTemplate folder. When copied rename the file to GridView_Edit.ascx and change the class name to GridView_EditField see Listings 1 & 2.

<%@ Page 
    Language="C#" 
    MasterPageFile="~/Site.master" 
    CodeFile="List.aspx.cs" 
    Inherits="List" %>

to

<%@ Control 
    Language="C#" 
    CodeFile="GridView_Edit.ascx.cs" 
    Inherits="GridView_EditField" %>

Listing 1 – Changing the class name of the GridView_Edit.ascx file

public partial class List : System.Web.UI.Page
{
...
}

to

public partial class GridView_EditField : FieldTemplateUserControl
{
...
}

Listing 2 - Changing the class name of the GridView_Edit.ascx.cs code behind file

Now in the GridView_Edit.ascx file trim out all the page relavent code:

i.e. remove the following tags (and their closing tags where applicable)

<asp:Content
<asp:UpdatePanel
<ContentTemplate>
<%@ Register 
    src="~/DynamicData/Content/FilterUserControl.ascx" 
    tagname="DynamicFilter" 
    tagprefix="asp" %>

<asp:DynamicDataManager 
    runat="server" 
    ID="DynamicDataManager1" 
    AutoLoadForeignKeys="true" />

Also remove from the GridView the columns tags and everything in them, and then add the following properties to the GridView:

AutoGenerateColumns="true"
AutoGenerateDeleteButton="true"
AutoGenerateEditButton="true"

and you should end up with something like Listing 3.

<%@ Control 
    Language="C#" 
    CodeFile="GridView_Edit.ascx.cs" 
    Inherits="GridView_EditField" %>

<%@ Register 
    src="~/DynamicData/Content/GridViewPager.ascx" 
    tagname="GridViewPager" 
    tagprefix="asp" %>

<asp:DynamicDataManager 
    runat="server" 
    ID="DynamicDataManager1" 
    AutoLoadForeignKeys="true" />

<asp:ScriptManagerProxy 
    runat="server" 
    ID="ScriptManagerProxy1" />

<asp:ValidationSummary 
    runat="server" 
    ID="ValidationSummary1" 
    EnableClientScript="true"
    HeaderText="List of validation errors" />
    
<asp:DynamicValidator 
    runat="server" 
    ID="GridViewValidator" 
    ControlToValidate="GridView1" 
    Display="None" />

<asp:GridView 
    runat="server" 
    ID="GridView1" 
    DataSourceID="GridDataSource"
    AllowPaging="True" 
    AllowSorting="True" 
    AutoGenerateColumns="true"
    AutoGenerateDeleteButton="true"
    AutoGenerateEditButton="true"
    CssClass="gridview">

    <PagerStyle CssClass="footer"/> 
           
    <PagerTemplate>
        <asp:GridViewPager runat="server" />
    </PagerTemplate>
    
    <EmptyDataTemplate>
        There are currently no items in this table.
    </EmptyDataTemplate>
    
</asp:GridView>

<asp:LinqDataSource 
    runat="server" 
    ID="GridDataSource" 
    EnableDelete="true">
</asp:LinqDataSource>

Listing 3 – the finished GridView_Edit.ascx file

Now we’ll trim down the GridView_Edit.ascx.cs, the first things to remove are the following methods and event handlers:

protected void Page_Load(object sender, EventArgs e)
protected void OnFilterSelectedIndexChanged(object sender, EventArgs e)

This will leave us with just the Page_Init to fill in see Listing 4 for it.

protected void Page_Init(object sender, EventArgs e)
{
    var metaChildColumn = Column as MetaChildrenColumn;
    var attribute = Column.Attributes.OfType<ShowColumnsAttribute>().SingleOrDefault();

    if (attribute != null)
    {
        if (!attribute.EnableDelete)
            EnableDelete = false;
        if (!attribute.EnableUpdate)
            EnableUpdate = false;
        if (attribute.DisplayColumns.Length > 0)
            DisplayColumns = attribute.DisplayColumns;
    }

    var metaForeignKeyColumn = metaChildColumn.ColumnInOtherTable as MetaForeignKeyColumn;

    if (metaChildColumn != null && metaForeignKeyColumn != null)
    {
        GridDataSource.ContextTypeName = metaChildColumn.ChildTable.DataContextType.Name;
        GridDataSource.TableName = metaChildColumn.ChildTable.Name;

        // enable update, delete and insert
        GridDataSource.EnableDelete = EnableDelete;
        GridDataSource.EnableInsert = EnableInsert;
        GridDataSource.EnableUpdate = EnableUpdate;
        GridView1.AutoGenerateDeleteButton = EnableDelete;
        GridView1.AutoGenerateEditButton = EnableUpdate;

        // get an instance of the MetaTable
        table = GridDataSource.GetTable();

        // Generate the columns as we can't rely on 
        // DynamicDataManager to do it for us.
        GridView1.ColumnsGenerator = new FieldTemplateRowGenerator(table, DisplayColumns);

        // setup the GridView's DataKeys
        String[] keys = new String[metaChildColumn.ChildTable.PrimaryKeyColumns.Count];
        int i = 0;
        foreach (var keyColumn in metaChildColumn.ChildTable.PrimaryKeyColumns)
        {
            keys[i] = keyColumn.Name;
            i++;
        }
        GridView1.DataKeyNames = keys;

        GridDataSource.AutoGenerateWhereClause = true;
    }
    else
    {
        // throw an error if set on column other than MetaChildrenColumns
        throw new InvalidOperationException("The GridView FieldTemplate can only be used with MetaChildrenColumns");
    }
}

Listing 4 – the Page_Init ***UPDATED 2008/09/24***

UPDATED 2008/09/24: Here I’ve completely remove the creation of the WHERE parameter into the OnDataBinding event handler see Listing 4a to handle multiple FK-PK relationships.
protected override void OnDataBinding(EventArgs e)
{
    base.OnDataBinding(e);

    var metaChildrenColumn = Column as MetaChildrenColumn;
    var metaForeignKeyColumn = metaChildrenColumn.ColumnInOtherTable as MetaForeignKeyColumn;

    // get the association attributes associated with MetaChildrenColumns
    var association = metaChildrenColumn.Attributes.
        OfType<System.Data.Linq.Mapping.AssociationAttribute>().FirstOrDefault();

    if (metaForeignKeyColumn != null && association != null)
    {

        // get keys ThisKey and OtherKey into Pairs
        var keys = new Dictionary<String, String>();
        var seperator = new char[] { ',' };
        var thisKeys = association.ThisKey.Split(seperator);
        var otherKeys = association.OtherKey.Split(seperator);
        for (int i = 0; i < thisKeys.Length; i++)
        {
            keys.Add(otherKeys[i], thisKeys[i]);
        }

        // setup the where clause 
        // support composite foreign keys
        foreach (String fkName in metaForeignKeyColumn.ForeignKeyNames)
        {
            // get the current pk column
            var fkColumn = metaChildrenColumn.ChildTable.GetColumn(fkName);

            // setup parameter
            var param = new Parameter();
            param.Name = fkColumn.Name;
            param.Type = fkColumn.TypeCode;

            // get the PK value for this FK column using the fk pk pairs
            param.DefaultValue = Request.QueryString[keys[fkName]];

            // add the where clause
            GridDataSource.WhereParameters.Add(param);
        }
    }
    // doing the work of this above because we can't
    // set the DynamicDataManager table or where values
    //DynamicDataManager1.RegisterControl(GridView1, false);
}

Listing 4a – OnDataBinding event handler ***ADDED 2008/09/24*** 

UPDATED 2008/08/11: This update removes the need for the Attribute defined in Listing 6 the GridView_Edit.ascx FieldTemplate now supports getting foreign key(s) automatically and support Clustered/Composite Keys. :D See this post from Zwitterion here Re: Dynamic child details on a dynymic details or edit page? where her mentions the Column.ColumnInOtherTable which gave me the idea for the above changes :D
UPDATED 2008/08/08: I’ve updated the above code in reply to a post where Zwitterion points out that I make the assumption that the child’s FK column is the same name as the parents PK column. so I’ve added an Attribute to fix this. And now I’ve added some more error handling to cover misuse of FieldTemplate

And now we will need to implement the GridViewColumnGenerator to fill in the rows as the DynamicDataManager would have done.

public class GridViewColumnGenerator : IAutoFieldGenerator
{
    protected MetaTable _table;

    public GridViewColumnGenerator(MetaTable table)
    {
        _table = table;
    }

    public ICollection GenerateFields(Control control)
    {
        List<DynamicField> oFields = new List<DynamicField>();

            foreach (var column in _table.Columns)
            {
                // carry on the loop at the next column  
                // if scaffold table is set to false or DenyRead
                if (!column.Scaffold)
                    continue;

                DynamicField field = new DynamicField();

                field.DataField = column.Name;
                oFields.Add(field);
            }
        return oFields;
    }
}
Listing 5 – the GridViewColumnGenerator class

In Listing 5 we have the GridViewColumnGenerator class which you can just tag onto the end the GridView_Edit.ascx.cs file as it is only used here.

[AttributeUsage(AttributeTargets.Property, AllowMultiple = false)]
public class GridViewTemplateAttribute : Attribute
{
    public String ForeignKeyColumn { get; private set; }

    public GridViewTemplateAttribute(string foreignKeyColumn)
    {
        ForeignKeyColumn = foreignKeyColumn;
    }
}

Listing 6 – GridViewTemplateAttribute for the above ***UPDATE 2008/08/08 *** :D

Note: This GridViewColumnGenerator class would need to be changed to the FilteredFieldsManager of the my permissions add on for Dynamic Data that I did on my blog here and here

GridView_Edit FieldTemplate in action

Figure 1 GridView_Edit FieldTemplate in action

!Important: Because you will need to apply UIHint metadata to the ChildrenColumn you wish to use this with you will also need to copy the FieldTemplate Children.ascx to GridView.ascx as in the previous post in this series, to have the column show in non edit/insert modes.

[UIHint("GridView")]
public object Order_Details { get; set; }

Listing 7 – Metadata

Until next time smile_teeth