As far as I can see there are three (oops! four then) types of Custom Page:
- Custom Pages Part 1 - Standard Custom Page based on an existing PageTemplate and customised in the DynamicData\CustomPages folder.
- Custom Pages Part 2 - A completely Custom Page again in the DynamicData\CustomPages folder.
- Custom Pages Part 3 - Standard ASP.Net Page with Dynamic Data features added to take advantage of the FieldTemplates.
- Custom Pages Part 4 - A DetailsView and a GridView using Validation Groups
- Custom Pages Part 5 - I18N? Internationalisation Custom Page
Creating a Completely Custom Page
This is relatively straight forward, this page will be a no frills page just the controls no formatting etc.
- Create a new web forms page in the ~/DynamicData/CustomPages/Orders folder with the name Edit.aspx you don’t need to apply a master page, this page is going to be simple.
<html xmlns="http://www.w3.org/1999/xhtml">
<head runat="server">
    <title></title>
</head>
<body>
    <form id="form1" runat="server">
    <div>

    </div>
    </form>
</body>
</html>
- Now you have the new Edit.aspx page in the Orders folder. Add a DetailsView give it an ID of dvOrders, now add a new LinqDataSource underneath the DetailsView give it an ID of ldsOrders.
<html xmlns="http://www.w3.org/1999/xhtml">
<head runat="server">
    <title></title>
</head>
<body>
    <form id="form1" runat="server">
    <div>
        <asp:DetailsView ID="dvOrders" runat="server" Height="50px" Width="125px">
        </asp:DetailsView>
        <asp:LinqDataSource ID="ldsOrders" runat="server">
        </asp:LinqDataSource>
    </div>
    </form>
</body>
</html>
- Now Configure the LinqDataSource to look at the Orders table and enable Updating.
<asp:LinqDataSource ID="ldsOrders" runat="server"
    ContextTypeName="NorthwindDataContext"
    EnableUpdate="True"
    TableName="Orders">
</asp:LinqDataSource>
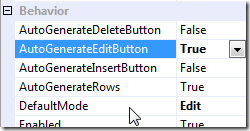
- Enable updating on the DetailsView and also set the DefaultMode to Edit, see below image.

<asp:DetailsView ID="dvOrders" runat="server"
    Height="50px"
    Width="125px"
    AutoGenerateEditButton="True"
    DefaultMode="Edit">
</asp:DetailsView>
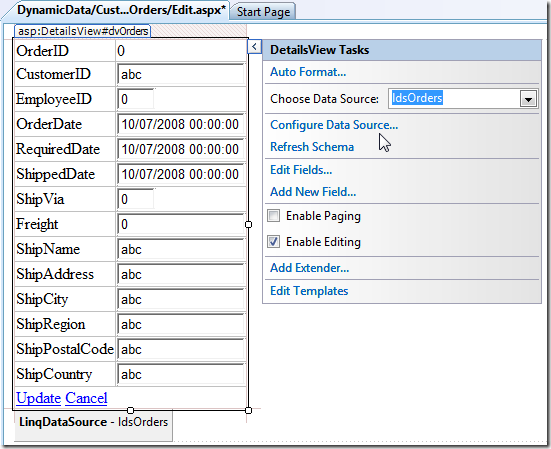
- Now point the DetailsView DataSource at the LinqDataSource ldsOrders and enable Editing

You will notice that the DetailsView has now had its fields populated:<Fields> <asp:BoundField DataField="OrderID" HeaderText="OrderID" InsertVisible="False" ReadOnly="True" SortExpression="OrderID" /> <asp:BoundField DataField="CustomerID" HeaderText="CustomerID" SortExpression="CustomerID" /> <asp:BoundField DataField="EmployeeID" HeaderText="EmployeeID" SortExpression="EmployeeID" /> <asp:BoundField DataField="OrderDate" HeaderText="OrderDate" SortExpression="OrderDate" /> <asp:BoundField DataField="RequiredDate" HeaderText="RequiredDate" SortExpression="RequiredDate" /> <asp:BoundField DataField="ShippedDate" HeaderText="ShippedDate" SortExpression="ShippedDate" /> <asp:BoundField DataField="ShipVia" HeaderText="ShipVia" SortExpression="ShipVia" /> <asp:BoundField DataField="Freight" HeaderText="Freight" SortExpression="Freight" /> <asp:BoundField DataField="ShipName" HeaderText="ShipName" SortExpression="ShipName" /> <asp:BoundField DataField="ShipAddress" HeaderText="ShipAddress" SortExpression="ShipAddress" /> <asp:BoundField DataField="ShipCity" HeaderText="ShipCity" SortExpression="ShipCity" /> <asp:BoundField DataField="ShipRegion" HeaderText="ShipRegion" SortExpression="ShipRegion" /> <asp:BoundField DataField="ShipPostalCode" HeaderText="ShipPostalCode" SortExpression="ShipPostalCode" /> <asp:BoundField DataField="ShipCountry" HeaderText="ShipCountry" SortExpression="ShipCountry" /> </Fields>
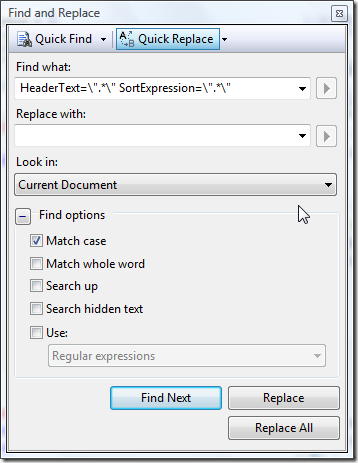
- We need to do a search and replace on the BoundField and replace it with DynamicField and also replace all the extra properties that are not used by DynamicField. For these fields use a Regular Expression search and replace with this string as the source:
HeaderText=\".*\" SortExpression=\".*\"
- Now All we have to do is change the foreign key fields to EntitySet/EntityRefs, i.e. CustomerID to Customers and ShipVia to Shipper. As in the last article you can find this information in the Linq to SQL classes designer.cs file.
<Fields>
    <asp:DynamicField DataField="OrderID" />
    <asp:DynamicField DataField="Customers" />
    <asp:DynamicField DataField="Employees" />
    <asp:DynamicField DataField="OrderDate" />
    <asp:DynamicField DataField="RequiredDate" />
    <asp:DynamicField DataField="ShippedDate" />
    <asp:DynamicField DataField="Shipper" />
    <asp:DynamicField DataField="Freight" />
    <asp:DynamicField DataField="ShipName" />
    <asp:DynamicField DataField="ShipAddress" />
    <asp:DynamicField DataField="ShipCity" />
    <asp:DynamicField DataField="ShipRegion" />
    <asp:DynamicField DataField="ShipPostalCode" />
    <asp:DynamicField DataField="ShipCountry" />
</Fields>
- Now at the beginning of the page add a ValidationSummary, DynamicDataManager and DynamicValidator see below:
<asp:ValidationSummary ID="ValidationSummary1" runat="server" EnableClientScript="true"
    HeaderText="List of validation errors" />
<asp:DynamicDataManager ID="ddmOrders" runat="server" />
<asp:DynamicValidator runat="server"
    ID="ddvOrders"
    ControlToValidate="gvOrders"
    Display="None">
</asp:DynamicValidator>
- In the code behind add the following:
using System; using System.Collections.Generic; using System.Linq; using System.Web; using System.Web.UI; using System.Web.UI.WebControls; // remember to add this using
using System.Web.DynamicData;
public partial class DynamicData_CustomPages_Orders_Edit : System.Web.UI.Page { // create a class level variable to hold the metatable protected MetaTable mtOrders; protected void Page_Init(object sender, EventArgs e) { // register the DetailsView with the DynamicDataManager ddmOrders.RegisterControl(dvOrders, true); } protected void Page_Load(object sender, EventArgs e) { // get the metatable mtOrders = ldsOrders.GetTable();
// add title to page
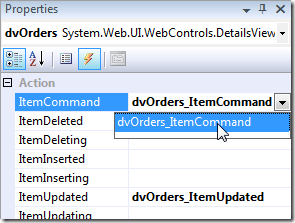
Title = “Orders”; } protected void dvOrders_ItemUpdated(object sender, DetailsViewUpdatedEventArgs e) { // make sure the Update worked before redirecting back to Order List if (e.Exception == null || e.ExceptionHandled) { Response.Redirect(mtOrders.ListActionPath); } } protected void dvOrders_ItemCommand(object sender, DetailsViewCommandEventArgs e) { //make sure that it's the Cancel command if (e.CommandName == DataControlCommands.CancelCommandName) { Response.Redirect(mtOrders.ListActionPath); } } } - Now select the event handlers for the DetailsView from it’s properties.

- Oh and pop a title in at the top of the page
<h1>Edit Order</h1>
And that's the bare minimum custom page, next the standard ASP.Net page using DynmaicData.
No comments:
Post a Comment