Showing posts with label FilterUserControl. Show all posts

Friday, 13 February 2009

AJAX History in a Dynamic Data Website

If you want to know a little more about AJAX History have a look at this video on MSDN Screencasts (used to be MSDN .Net Nuggets) Managing Browser History with ASP.NET AJAX and the ASP.NET 3.5 Extensions Preview it is slightly out of date in that some of the properties have been renamed but its essentially correct and a good foundation for AJAX History’s use. There is a second article Managing Browser History on the Client with ASP.NET AJAX and the ASP.NET 3.5 Extensions Preview which may be of interest for some.

The Problem

To appreciate the solution you need to understand the problem. So here’s what happens you have a standard ASP.Net Dynamic Data V1 website with several filters on each list page, there are two things that will irritate your users to do with AJAX partial post back:

1. You make several selections and click back you will go to the previous page not the last selection (try it with and without partial render enabled in site.master EnablePartialRendering="true" see Listing 1).

<html xmlns="http://www.w3.org/1999/xhtml">
<head runat="server">
    <title>Dynamic Data Site</title>
    <link href="~/Site.css" rel="stylesheet" type="text/css" />
</head>
<body class="template">
    <h1><span class="allcaps">Dynamic Data Site</span></h1>
    <div class="back">
        <a runat="server" href="~/"><img alt="Back to home page" runat="server" src="DynamicData/Content/Images/back.gif" />Back to home page</a>
    </div>

    <form id="form1" runat="server">
    <div>
        <asp:ScriptManager ID="ScriptManager1" runat="server" EnablePartialRendering="true"/>
        <asp:ContentPlaceHolder id="ContentPlaceHolder1" runat="server">
        </asp:ContentPlaceHolder>
    </div>
    </form>
</body>
</html>

Listing 1 – the default Site.master

2. You click a link from a List page on which you have made several filter selections view the sub page and then click back you reach the page with no filtering applied.

Both of these issues can be really irritating for the user, because A it’s not the expected behaviour and B it’s a pain to have to redo all those filters (after all users are really lazy smile_omg)

Have you watched the video? well if you have no prior knowledge of AJAX History I strongly suggest you have a look at the video after all it's only 13mins 27secs long.

The Solution

First of all this is only my first attempt at this I think once I get into the Dynamic Data V2.0 Preview/Release I will redo this as a class that inherits from UserFilterControlBase to easily give this functionality in filter templates.

<asp:ScriptManager 
    ID="ScriptManager1" 
    runat="server" 
    EnableHistory="true"
    EnableSecureHistoryState="false"
    EnablePartialRendering="true"/>

Listing 2 – the ScriptManager on Site.master alterations

As you can see from the Listing 2 enabling AJAX History is quite easy you just need to add the EnableHistory="true" property to the control. The other property is to disable encryption of the history information that is added to the URL EnableSecureHistoryState="false" this is one of the methods that have been renamed for the RTM version.

Now we need to edit the ~/DynamicData/Content/FilterUserControl.ascx.cs file see Listing 3 for the code all alteration are in BOLD italic.

using System;
using System.Collections.Specialized;
using System.Linq;
using System.Web.UI;
using System.Web.UI.WebControls;

public partial class FilterUserControl : System.Web.DynamicData.FilterUserControlBase
{
    // global variable for holding the History Point value
    private String HistoryPointValue;

    public event EventHandler SelectedIndexChanged
    {
        add
        {
            DropDownList1.SelectedIndexChanged += value;
        }
        remove
        {
            DropDownList1.SelectedIndexChanged -= value;
        }
    }

    public override string SelectedValue
    {
        get
        {
            return DropDownList1.SelectedValue;
        }
    }

    protected void Page_Init(object sender, EventArgs e)
    {
        if (!Page.IsPostBack)
        {
            PopulateListControl(DropDownList1);

            // Set the initial value if there is one
            if (!String.IsNullOrEmpty(InitialValue))
                DropDownList1.SelectedValue = InitialValue;
        }

        // add event handler to capture history point.
        this.SelectedIndexChanged += ThisSelectedIndexChanged;

        // Add OnNavigate handler to restore History points.
        var scriptManager = ScriptManager.GetCurrent(Page);
        if (scriptManager != null)
            scriptManager.Navigate += ScriptManagerOnNavigate;
    }

    protected void ThisSelectedIndexChanged(object sender, EventArgs e)
    {
        var filterRepeater = this.GetParentFilterRepeater();
        if (filterRepeater != null)
        {
            // add History point for the curret state of
            // all filters so we can restore them later.
            var scriptManager = ScriptManager.GetCurrent(Page);
            if (scriptManager != null && scriptManager.IsInAsyncPostBack)
            {
                var nvcHistory = new NameValueCollection();

                var filterControls = filterRepeater.GetFilterControls();
                if (filterControls.Count() > 0)
                {
                    foreach (var filter in filterControls)
                    {
                        var f = filter as FilterUserControl;
                        if (f != null)
                            nvcHistory.Add(f.DataField, f.SelectedValue);
                    }
                    // if we get some filter states add the history point.
                    if (nvcHistory.Count > 0)
                        scriptManager.AddHistoryPoint(nvcHistory, Page.Title);
                }
            }
        }
    }

    protected void ScriptManagerOnNavigate(object sender, HistoryEventArgs e)
    {
        HistoryPointValue = e.State[DataField];
        if (e.State[DataField] == null || e.State[DataField] == "")
            DropDownList1.SelectedIndex = 0;
        else if(HistoryPointValue != null)
        {
            // check if history point is in the DDL and set History Point value
            ListItem item = DropDownList1.Items.FindByValue(HistoryPointValue);
            if (item != null)
                DropDownList1.SelectedValue = HistoryPointValue;
        }
    }
}

Listing 3 – FilterUserControl.ascx.cs file

And finally here are the extension methods use in Listing 3.

using System.Collections.Generic;
using System.Linq;
using System.Web.DynamicData;
using System.Web.UI;
using System.Web.UI.WebControls;

/// <summary>
/// Summary description for ExtensionMethods
/// </summary>
public static class ExtensionMethods
{
    /// <summary>
    /// Get the parent FilterRepeater of the control it's used on.
    /// </summary>
    /// <param name="control">The control to find the parent FilterRepeater of.</param>
    /// <returns>The parent FilterRepeater.</returns>
    public static FilterRepeater GetParentFilterRepeater(this Control control)
    {
        var parentControl = control.Parent;
        while (parentControl != null)
        {
            var FilterRepeater = parentControl as FilterRepeater;
            if (FilterRepeater != null)
                return FilterRepeater;
            else
                parentControl = parentControl.Parent;
        }
        return null;
    }

    /// <summary>
    /// Get a List of FilterUserControlBase filters from the FilterRepeater.
    /// </summary>
    /// <param name="filterRepeater">The FilterRepeater to get a List of filter from</param>
    /// <returns>returns a List of type FilterUserControlBase.</returns>
    public static IEnumerable<UserControl> GetFilterControls(this FilterRepeater filterRepeater)
    {
        var filters = new List<UserControl>();

        foreach (RepeaterItem item in filterRepeater.Items)
        {
            var filter = item.Controls.OfType<UserControl>().FirstOrDefault();
            filters.Add(filter);
        }

        return filters.AsEnumerable();
    }
}

Listing 4 – Extension methods

Now when you skip back and forth through pages you should find it works just like you and your users were expecting.

Tuesday, 9 September 2008

Dynamic Data Futures – Part 3 – AnyColumnAutocomplete Filter

  1. Part 1 - Getting Dynamic Data Futures filters working in a File Based Website.
  2. Part 2 - Create the AnyColumn filter from the Dynamic Data Futures Integer filter.
  3. Part 3 – Creating the AnyColumnAutocomplete filter.

Creating the AnyColumnAutocomplete filter

This version of the Autocomplete filter was adapted in response to this article on the Dynamic Data forum by levalencia.

The issue is that the Autocomplete filter and AutocompleteFilter web service is designed to work with Foreign Key columns, I thought this would be like the previous article in this series and be quite simple, instead it turned out to be a bit more complicated smile_thinking.

Making the AnyColumnAutocomplete FieldTemplate.

The issue initially was that the Autocomplete filter was assuming MetaForeignKeyColumn fkColumn and then referencing the ParentTable from it this meant that we needed a new FieldTemplate no just some tweaking.

protected void Page_Init(object sender, EventArgs e)
{
    var fkColumn = Column as MetaForeignKeyColumn;

    //// dynamically build the context key so the web service knows which table we're talking about
    autoComplete1.ContextKey = AutocompleteFilterService.GetContextKey(fkColumn.ParentTable);
    ...
}

Listing 1 – Autocomplete filter Page_Init

And then in the AutocompleteFilter web service has no reference to the column this meant that either we create a new web service of modify the current I decided to modify it as there were only a few new methods needed to handle the non foreign key columns.

So without any further ado here’s the changes to the FieldTemplate to make the AnyColumnAutocomplete filter.

We remove the line:

var fkColumn = Column as MetaForeignKeyColumn;

and replace all referenced to fkColumn.PartentTable with Column.Table or Column

e.g. change

MetaTable parentTable = fkColumn.ParentTable;
to
MetaTable parentTable = Column.Table;

And change the following line

autoComplete1.ContextKey = AutocompleteFilterService.GetContextKey(fkColumn.ParentTable);

to

autoComplete1.ContextKey = AutocompleteFilterService.GetContextKey(Column);

And that's the changes to make the AnyColumnAutocomplete filter.

Now the changes to the AutocompleteFilter web service

The first change to the AutocompleteFilter web service was to add an overloaded GetContextKey that takes a MetaTable as remember this line from above:

autoComplete1.ContextKey = AutocompleteFilterService.GetContextKey(Column);

So the overloaded method takes a MetaColumn as it’s parameter not MetaTable:

public static string GetContextKey(MetaColumn column)
{
    return String.Format("{0}#{1}#{2}", column.Table.DataContextType.FullName, column.Table.Name, column.Name);
}

Listing 2 – GetContextKey method

Note: That from the column it gets similar properties as the original but also get the Column.Name

Next the changes to the GetCompletionList which returns the list of results.

[System.Web.Services.WebMethod]
[System.Web.Script.Services.ScriptMethod]
public string[] GetCompletionList(string prefixText, int count, string contextKey) {
    MetaTable table = GetTable(contextKey);

    IQueryable queryable = BuildFilterQuery(table, prefixText, count);

    return queryable.Cast<object>().Select(row => CreateAutoCompleteItem(table, row)).ToArray();
}

Listing 3 – GetCompletionList original method

[System.Web.Services.WebMethod]
[System.Web.Script.Services.ScriptMethod]
public string[] GetCompletionList(string prefixText, int count, string contextKey)
{
    MetaTable table;
    String[] param = contextKey.Split('#');

    if (param.Length > 2)
    {
        table = GetTable(contextKey);
        var list = BuildFilterQuery(table, prefixText, count, param[2]);

        return list;
    }
    else
    {
        table = GetTable(contextKey);
        IQueryable queryable = BuildFilterQuery(table, prefixText, count);

        return queryable.Cast<object>().Select(row => CreateAutoCompleteItem(table, row)).ToArray();
    }
}

Listing 4 – GetCompletionList modified method

In the modified version we split the contectKey into param local variable and check the number of entries to determine whether it’s dealing with ForeignKey column or any other column.

Also note the minor change to the GetTable method where the number of parameters is check and added a check for 2 OR 3 paramers.

Debug.Assert(param.Length == 2  param.Length == 3, String.Format("The context key '{0}' is invalid", contextKey));

After this I have added another overloaded method for the BuildFilterQuery which also takes the column name.

private static String[] BuildFilterQuery(
    MetaTable table,
    string prefixText,
    int maxCount,
    String columnName)
{
    var column = table.GetColumn(columnName);

    // query = {Table(Customer)}
    var query = table.GetQuery();

    // row
    // entityParam = {row}
    var entityParam = Expression.Parameter(column.Table.EntityType, "row");

    // row.DisplayName
    //var property = Expression.Property(entityParam, columnName);
    //property = {row.City}
    var property = Expression.Property(entityParam, column.EntityTypeProperty);

    // row => row.Property
    // columnLambda = {row => row.City}
    var columnLambda = Expression.Lambda(property, entityParam);

    // "prefix"
    // constant = {"Lo"}
    var constant = Expression.Constant(prefixText);

    // row.DisplayName.StartsWith("prefix")
    // startsWithCall = {row.City.StartsWith("Lo")}
    var startsWithCall = Expression.Call(
        property,
        typeof(string).GetMethod("StartsWith", new Type[] { typeof(string) }),
        constant);

    // row => row.DisplayName.StartsWith("prefix")
    // whereLambda = {row => row.City.StartsWith("Lo")}
    var whereLambda = Expression.Lambda(startsWithCall, entityParam);

    // Customers.Where(row => row.DisplayName.StartsWith("prefix"))
    // whereCall = {Table(Customer).Where(row => row.City.StartsWith("Lo"))}
    var whereCall = Expression.Call(
        typeof(Queryable),
        "Where",
        new Type[] { table.EntityType },
        query.Expression,
        whereLambda);

    // query.Select(row => row.Property)
    // selectCall = {Table(Customer).Where(row => row.City.StartsWith("Lo")).Select(row => row.City)}
    var selectCall = Expression.Call(
        typeof(Queryable),
        "Select",
        new Type[] { query.ElementType, columnLambda.Body.Type },
        whereCall,
        columnLambda);

    // query.Select(row => row.Property).Distinct
    // distinctCall = {Table(Customer).Where(row => row.City.StartsWith("Lo")).Select(row => row.City).Distinct()}
    var distinctCall = Expression.Call(
        typeof(Queryable),
        "Distinct",
        new Type[] { column.EntityTypeProperty.PropertyType },
        selectCall);

    // Customers.Where(row => row.DisplayName.StartsWith("prefix")).Take(20)
    // distinctCall = {Table(Customer).Where(row => row.City.StartsWith("Lo")).Select(row => row.City).Distinct().Take(20)}
    var takeCall = Expression.Call(
        typeof(Queryable),
        "Take",
        new Type[] { typeof(String) },
        distinctCall,
        Expression.Constant(maxCount));

    var result = query.Provider.CreateQuery(takeCall);
    List<String> list = new List<string>();
    foreach (var item in result)
    {
        list.Add(AutoCompleteExtender.CreateAutoCompleteItem(item.ToString(), item.ToString()));
    }

    return list.ToArray();
    //return query.Provider.CreateQuery(distinctCall);
}

Listing 5 – overloaded BuildFilterQuery method

Listing 5 essentially does what Sample 1 does; which get the first two cities from the Customer table where they begin with “Br” and makes sure they are distinct.

var DC = new NWDataContext();
var q = (from c in DC.Customers
        where c.City.StartsWith("Br")
        select c.City).Distinct().Take(2);

Sample 1 – getting the first 2 customer whose City starts with “Br”

And then returns an array that is ready to pass back to the AjaxToolkit Autocomplete control.

And here’s the Metadata classes

[MetadataType(typeof(Customer_MD))]
public partial class Customer
{
    public class Customer_MD
    {
        [Filter(FilterControl = "AnyColumnAutocomplete")]
        public object City { get; set; }
    }
}

Listing 6 – metadata classes

Website project file (not including Dynamic Data Futures project)

Hope this helps smile_teeth

Wednesday, 3 September 2008

Dynamic Data Futures – Part 1 Adding Advanced Filters ***UPDATED***

  1. Part 1 - Getting Dynamic Data Futures filters working in a File Based Website.
  2. Part 2 - Create the AnyColumn filter from the Dynamic Data Futures Integer filter.
  3. Part 3 – Creating the AnyColumnAutocomplete filter.

Getting Dynamic Data Futures filters working in File Based Website

1. Adding Dynamic Data Futures to your Website

From the File menu of you file based website select Add –> Existing Project… (see Figure 1) and browse to the folder where you unzipped the Dynamic Data Futures to, and select the DynamicDataFutures.csproj file this will add the Futures project and none of the samples.

Adding an Existing Project to the file based website

Figure 1 – Adding an Existing Project to the file based website

2. Adding a Reference to Dynamic Data Futures and AjaxToolkit

Right mouse click the website root and click Add Reference…

Adding a reference to the website

Figure 2  - Adding a reference to the website

When the dialogue box pops up choose the Projects Tab and select the DynamicDataFutures project and click OK.

Now you will need to do the same for the AjaxToolkit, only this time you need to click the Browse tab and navigate to the folder where you have downloaded and extracted the AjaxToolkit to, select the DLL in the sample website’s bin folder and click OK.

Selecting the AjaxToolkit DLL

Figure 3 – Selecting the AjaxToolkit DLL

3. Adding the new Filter User Controls to the website

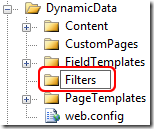
Right mouse click the DynamicData folder in your Dynamic Data Website and select New Folder, name the folder Filters.

Adding the Filters Folder

Figure 4 – Adding the Filters Folder

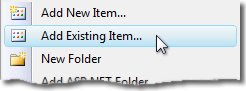
New right mouse click the newly created folder and select Add Existing Items…

Add Existing Items

Figure 5 - Add Existing Items

Browse to the folder containing DynamicDataFutures project and then navigate to the DynamicData\Filters folder in the samples website

Selecting the Filter files (excluding the designer files)

Figure 6 – Selecting the Filter files (excluding the designer files)

Now select all except the .designer.cs files and click Add.

Now we will need to copy the following files:

Copy the following to the App_Code folder.

  • AutocompleteFilter.asmx.cs
  • CascadeAttribute.cs

Copy the following to the root of the website.

  • AutocompleteFilter.asmx
  • AutocompleteStyle.css
  • AjaxToolkitFixes.css

4. Converting Web Application files to work in a file based Website

We are going to use some advanced search and replace (not just because I like showing off) to demonstrate these features in Visual Studio 2008:

  • Search and replace using simple regular expression.
  • Replace by file extension.
  • Replace in files in a particular folder.

Things that need to be changes:

  • Namespaces needs to be removed from the Inherits property of the control tag in the ascx files.
  • CodeBehind changes to CodeFile
  • Namespace surrounding the user control class in the ascx.cs files.

To Find and Replace in only the DynamicData\Filters folder:

Find and Replace if Files in a specific folder

Figure 7 – Find and Replace if Files in a specific folder

Using Figure 6 use the following steps with each of the Search Patterns.

  1. Enter the text to search for.
  2. If you need to do it in all the sub-folders.
  3. Click to set the folder to find file in (see Figure 7).
  4. Note the Match case option is not checked (when searching for CodeBehind you may miss codebehind or Codebehind or codeBehind with it checked).
  5. Check when using Regular Expressions or Wild Cards.
  6. The files extension or pattern to match.
  7. Click to start the Find and Replace.

Setting the Search Folders

Figure 8 – Setting the Search Folders

  1. Click the up folder button until you see some folders below then navigate to you website and the DynamicData folder.
  2. Click the add button to add the folder to the list of folders to search in (we are only interested in the Filters folder here).
  3. The folder is added to the Selected folders list.

Search Patterns:

start without the Regular expression checkbox unchecked.

  1. Find Inherits="DynamicDataFuturesSample. and Replace with Inherits="
  2. Find CodeBehind and Replace with CodeFile

Check the Regular expression checkbox for this.

  1. Find namespace DynamicDataFuturesSample\n\{\n Replace with "" nothing.
  2. Find namespace DynamicDataFuturesSample \{\n Replace with "" nothing (Note the space instead of the \n).
  3. Find \n\} and replace with nothing.
  4. Note: Note there is only ever one } preceded by a linefeed except if you have two classes in the same file, also if you repeat the search after doing a CTRL+K and CTRL-D to reformat the code, then you will again remove the last brace in the file.
  5. The hit CTRL+K and CTRL-D to reformat the code in each file before saving it.

And now manually edit the following three files removing namespace and changing NOT CodeBehind to CodeFile in AutocompleteFilter.asmx.

  1. AutocompleteFilter.asmx.cs
  2. AutocompleteFilter.asmx
  3. CascadeAttribute.cs

5. Making the Necessary Changes to allow Advanced Filter to Work

To make Dynamic Data Futures work with the website we will need to make the following changes to the List and ListDetails pages:

  • Add a Tag Mapping in the web.config.
  • Register the Dynamic Data Futures assembly and tag in the web.config.
  • Change each PageTemplates FilterRepeater a little.
  • Edit the Site.master to add a link to the AutocompleteStyle.css file ***UPDATED***
Note: The Tag mapping is a great idea and I didn’t know it was there until DynamicDataFutures added the ImprovedDynamicValidator.

So add the Tag Mapping to the pages collection in configuration->system.web->pages see Listing 1.

<configuration>
...
<system.web>
...
<
pages>
<controls>
...
</
controls>
<tagMapping>
...
</tagMapping>

Listing 1 – Where to add the Tag Mapping

Listing 2 shows the Tag Mapping to be added, as you can see the classes including full namespace are show in tagType and mappedTagType.

<add tagType="System.Web.DynamicData.FilterRepeater" 
     mappedTagType="Microsoft.Web.DynamicData.AdvancedFilterRepeater" />

Listing 2 – The Tag Mapping

This sorts out the FilterRepeater being replaced by the AdvancedFilterRepeater.

<add tagPrefix="asp" 
     namespace="Microsoft.Web.DynamicData" 
     assembly="Microsoft.Web.DynamicData"/>

Listing 3 – Register the Dynamic Data Futures assembly and tag

Listing 3 add a registration for the Dynamic Data Futures assembly and tag in the web.config.

<add namespace="AjaxControlToolkit" 
     assembly="AjaxControlToolkit" 
     tagPrefix="ajaxToolkit"/>

Listing 4 – Add Ajax Toolkit to the website

Note: You need to add the AjaxToolkit and Dynamic Data Futures assemblies and tags to the controls collection, the AjaxToolkit is need as some of the other Filters require it.

Next in the List.aspx and ListDetails.aspx PageTemplates you need to add the DelegatingFilter and remove the DynamicFilter and also remove the AssociatedControlID="DynamicFilter$DropDownList1" from the Label control above the DynamicFilter making the whole FilterRepeater (aliased AdvancedFilterRepeater via Tag Mapping) look like Listing 5.

<asp:FilterRepeater ID="FilterRepeater" runat="server">
    <ItemTemplate>
        <asp:Label runat="server" Text='<%# Eval("DisplayName") %>' />
        <asp:DelegatingFilter 
            runat="server" 
            ID="DynamicFilter" 
            OnSelectionChanged="OnFilterSelectedIndexChanged" />
    </ItemTemplate>
    <FooterTemplate>
        <br />
        <br />
    </FooterTemplate>
</asp:FilterRepeater>

Listing 5 – The finished FilterRepeater.

Note: It would have been nice to map the DynamicFilter to DelegatingFilter also but the parameters are not the same between controls, I suppose you could always rename them in the DynamicDataFutures source and then map it. But then when a new version DynamicDataFutures is released you would need to remember to rename the properties again.
The DynamicFilter has OnSelectedIndexChanged and the DelegatingFilter has OnSelectionChanged, if they were the same you could also use the tag mapping.

Add the following line to the Site.master head tag

<head runat="server">
    <title>Dynamic Data Site</title>
    <link href="~/Site.css" rel="stylesheet" type="text/css" />
    <link href="AutocompleteStyle.css" rel="stylesheet" type="text/css" />
<link href="AjaxToolkitFixes.css" rel="stylesheet" type="text/css" />
</head>

Listing 6  - adding a link to the Site.master head

UPDATED: Forget to add a link to the AjaxToolkitFixes.css and AutocompleteStyle.css in the Site.master file.

6. Now to Test the AdvancedFilterRepeater and new Filters

To test this out we need to add a Metadata file to our website, see Listing 6.

using System;
using System.Collections.Generic;
using System.ComponentModel;
using System.ComponentModel.DataAnnotations;
using System.Linq;
using System.Web;
using Microsoft.Web.DynamicData;

[MetadataType(typeof(Order_Detail_MD))]
public partial class Order_Detail
{
    public class Order_Detail_MD
    {
        // Use the Cascade.ascx filter control. 
        //
        // Specify that the list of items in the products filter should be
        // filtered by the Product.Category foreign key column.
        [Filter(FilterControl = "Cascade")]
        [Cascade("Category")]
        public object Product { get; set; }

        // Don't show the Order filter
        [Filter(Enabled = false)]
        public object Order { get; set; }
    }
}

Listing 7 – Order_Details Metadata

Run the website and go to Order_Details table and you should have the Cascade filter there and also the Orders filter should be missing also, see Figure 9.

Cascade filter in operation

Figure 9 – Cascade filter in operation

The next step is to add our own filter the AnyColumn filter which of course will filter any column.

Saturday, 2 August 2008

Dynamic Data and Field Templates - A Second Advanced FieldTemplate ***UPDATED***

  1. The Anatomy of a FieldTemplate.
  2. Your First FieldTemplate.
  3. An Advanced FieldTemplate.
  4. A Second Advanced FieldTemplate.
  5. An Advanced FieldTemplate with a GridView.
  6. An Advanced FieldTemplate with a DetailsView.
  7. An Advanced FieldTemplate with a GridView/DetailsView Project.

For this article we are going to convert the CascadingFilter from Dynamic Data Futures project this was thought of by Noimed in this thread.

Files Required for this Project

Here are all of the files we will need to copy to our project from the Dynamic Data Futures project:

From the sample website DynamicDataFuturesSample\DynamicData\Filters folder to the our projects DynamicData\FieldTemplates folder

  • Cascade.ascx
  • Cascade.ascx.cs

From the sample website DynamicDataFuturesSample root to our projects App_Code folder

  • CascadeAttribultes.cs

Plus we will need to add a reference to the DynamicDataFutures project or just copy the Microsoft.Web.DynamicData.dll to the bin folder of our project (you will need to create a bin folder manually if you just copy the dll).

What Cascading Filter does

Cascading filter in Edit/Insert modes, I pointed him to the previous post in this series and we eventually sorted it so it worked as a FieldTemplate. This returns the Primary Key of the parent table see Figure 1.

Order_Details relationships

Figure 1 - Order_Details relationships

In this diagram you can see that Product is grouped Category so the CascadingFilter user control would be ideal for picking the product on the Order_Detail Insert page.

Note: You can’t edit the Product on the Order_Detail form because the Primary Key of Order_Detail is OrderID combined with ProductID :D

So in our sample we will be filtering the Product by the Category.

Creating the Website Project and Adding the Files

The first thing to do will be to create a file based website and add the Northwind database to it. This can be done simply (if you have SQL Server Express 2005/2008 installed) by creating a App_Data folder and copying the Northwind.mdb file to it (the Northwind database can be downloaded from here).

Then add an App_Code folder to the website and add a new Linq to SQL classes item it call it NW.dbml and add at lease the above table to it.

Now copy the files listed in the “Files Required for this Project” and add the reference to Dynamic Data Futures project.

Lets add a reference to the Dynamic Data Futures project; I do this by first adding an existing project, you do this by clicking File->Add->Existing Project...

Adding an Existing project

Figure 2 - Adding an Existing project

Browse to the location you have you Dynamic Data Futures project and select the project file.

Now right click the website and choose Add Reference when the dialogue box pops up select the Projects tab and choose the Dynamic Data Futures project and click the OK button.

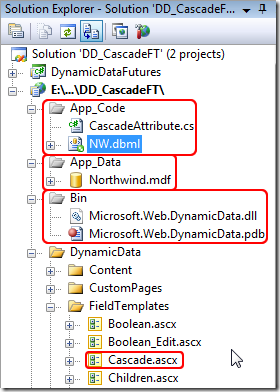
Your project should now look like Figure 3.

How the project should look after adding the files and references

Figure 3 – How the project should look after adding the files and references

Note: Don’t forget the add your data context to the Global.asax file and set ScaffoldAllTables to true

Modifying the added files

Remove the namespace for the CascadeAttribute.cs file and save that’s done.

Note: Removing the namespace is for file based website only in a Web Application Project you would need to change the namespace to match your applications.

And now lets sort out the Cascade filter. We start by renaming the Cascade.ascx to Cascade_Edit.ascx and then edit both files:

<%@ Control 
    Language="C#" 
    AutoEventWireup="true" 
    CodeFile="Cascade_Edit.ascx.cs" 
    Inherits="Cascade_EditField" %>
<%-- Controls will be added dynamically. See code file. --%>

Listing 1 – Cascade_Edit.ascx

Remove the DynamicDataFuturesSample. from the beginning of the Inherits Control property.

Then edit the Cascade_Edit.ascx.cs file:

namespace DynamicDataFuturesSample
{
    public partial class Cascade_Filter : FilterUserControlBase, ISelectionChangedAware
    {

Listing 2 – Cascade_Edit.ascx.cs

Remove the namespace from around the control class and change the inheritance from FilterUserControlBase, ISelectionChangedAware to FieldTemplateUserControl as in Listing 3.

public partial class Cascade_Filter : FieldTemplateUserControl
{

Listing 3 – Altered Cascade_Edit.ascx.cs

Remove the following section as this is for Filters

public override string SelectedValue
{
    get
    {
        return filterDropDown.SelectedValue;
    }
}

Listing 4 – Remove SelectedValue method

Open ForeignKey_Edit.ascx.cs and copy the following sections to the Cascading_Edit.ascx.cs

protected override void ExtractValues(IOrderedDictionary dictionary)
{
    //...
} public override Control DataControl { //...
}

Listing 5 – Methods to copy from ForeignKey_Edit.ascx.cs

Now Edit the ExtractValues and DataControl methods so they look like Listing 6.

protected override void ExtractValues(IOrderedDictionary dictionary)
{
    // If it's an empty string, change it to null
    string val = filterDropDown.SelectedValue;
    if (val == String.Empty)
        val = null;

    ExtractForeignKey(dictionary, val);
}

public override Control DataControl
{
    get
    {
        return filterDropDown;
    }
}

Listing 6 – Finished ExtractValues and DataControl methods

Note: You will also probably need to add the following using: using System.Collections.Specialized; for the IOrderedDictionary and using System.Web.UI; for the Control.

Adding the Metadata

We have to add the following telling the Cascade FieldTemplate what it needs, it need to know what table to use to filter the main parent table by, in this case the Category table. And we need the UIHint to tell Dynamic Data to use the Cascade FieldTemplate.

using System;
using System.ComponentModel;
using System.ComponentModel.DataAnnotations;
using Microsoft.Web.DynamicData;

[MetadataType(typeof(Order_DetailMD))]
public partial class Order_Detail
{
    public class Order_DetailMD
    {
        [Cascade("Category")]
        [UIHint("Cascade")]
        public object Product { get; set; }
    }
}

Listing 7 – the metadata

One last thing we need to add a Cascade.ascx FieldTemplate to the FieldTemplates folder as there is no way of Dynamic Data knowing what FieldTemplate to use in Read-Only mode. For this we will just copy ForeignKey.ascx as Cascade.ascx and change the class name from ForeignKeyField to CascadeField.

Add some Business Logic/Validation

Because we are using Order_Details table which has a composite primary key see below:

Order Details table

Figure 4 - Order Details table

So we need to add some business logic to validate this before insert.

public partial class NWDataContext
{
    partial void InsertOrder_Detail(Order_Detail instance)
    {
        var DC = new NWDataContext();
        var dk = DC.Order_Details.SingleOrDefault(
            od => od.OrderID == instance.OrderID && od.ProductID == instance.ProductID
            );

        if (dk != null)
        {
            // if a record is found throw an exception
            String error = "Duplicate Primary keys not allowed (OrderID={0} ProductID={1})";
            throw new ValidationException(String.Format(error, instance.OrderID, instance.ProductID));
        }
        else
        {
            // finnaly send to the database
            this.ExecuteDynamicInsert(instance);
        }
    }
}

Listing 8 – InsertOrder_Details partial method

This just checks the database to see if this is a duplicate primary key and if so generates a validation error.

Cascade FieldTemplate in Action 

Figure 5 – Cascade FieldTemplate in Action

Business Logic in action

Figure 6 – Business Logic in action

Adding Sorting to the Filters DropDownList ***UPDATED***

In the Cascase.ascx.cd FilterControl and Cascade_Edit.ascx.cs FieldTemplate you will find a method GetChildListFilteredByParent this returns the values for the filtered DropDownList, but as you will see this list is an unordered list. To add sorting to this list we need to add a Linq OrderBy clause. As you will see the code in Listing 9 is making use of the Expression class to create an expression tree smile_confused these are not really hard to understand, it’s just that there are so few examples and tutorials for us to get our teeth into.

So what I’ve done here is add a OrderBy clause which does the trick :D

private IQueryable GetChildListFilteredByParent(object selectedParent)
{
    var query = filterTable.GetQuery(context);
    // this make more sense as the parameter now has the table name (filteredTable.Name)
    // note the change from "product" to filterTable.Name
    var parameter = Expression.Parameter(filterTable.EntityType, filterTable.Name);
    // product.Category
    var property = Expression.Property(parameter, filterTableColumnName);
    // selectedCategory
    var constant = Expression.Constant(selectedParent);
    // product.Category == selectedCategory
    var predicate = Expression.Equal(property, constant);
    // product => product.Category == selectedCategory
    var lambda = Expression.Lambda(predicate, parameter);
    // Products.Where(product => product.Category == selectedCategory)
    var whereCall = Expression.Call(typeof(Queryable), "Where", new Type[] { filterTable.EntityType }, query.Expression, lambda);


    //================================== Order by ================================
    if (filterTable.SortColumn != null)
    {
        // this make more sense as the parameter now has the table name (filteredTable.Name)
        // table.sortColumn
        var sortProperty = Expression.Property(parameter, filterTable.SortColumn.Name);

        // Column => Column.SortColumn
        var orderByLambda = Expression.Lambda(sortProperty, parameter);

        //.OrderBy(Column => Column.SortColumn)
        MethodCallExpression orderByCall = Expression.Call(
            typeof(Queryable),
            "OrderBy",
            new Type[] { filterTable.EntityType, filterTable.SortColumn.ColumnType },
            whereCall,
            orderByLambda);


        //{
        //Table(Product).
        //Where(Products => (Products.Category = value(Category))).
        //OrderBy(Products => Products.ProductName)
        //}
        return query.Provider.CreateQuery(orderByCall);
    }//================================== Order by ================================
    else
    {
        return query.Provider.CreateQuery(whereCall);
    }
}

Listing 9 - GetChildListFilteredByParent

The section between the OrderBy comments is mine gleaned from various bits on the Internet, and also I’ve change the return line of the method to return the orderByCall which was whereCall previously.

To make this work you will need to add a DisplayColumn attribute to the metadata with the sort column added see Listing 10.

[MetadataType(typeof(ProductMD))]
[DisplayColumn("ProductName","ProductName")]
public partial class Product{}

Figure 10 – SortColumn added to DisplayColumn

The second parameter of DisplayColumn is the SortColumn when this is added then the GroupBy will be added to the where clause.

Note: You can transplant this code strait into the Cascade Filter as well smile_teeth.
Note: It should be possible to sort the parent DropDownList using a similar method.

And that about wraps it up.

Until next time.smile_teeth

Monday, 26 May 2008

DynamicData Sorting - FilterUserControl and ForeignKey_Edit.ascx user controls

Sorting - FilterUserControl and ForeignKey_Edit.ascx user controls

To sort either the Filter on a list page of the FK drop down lists, you can use DisplayColumnAttribute which can takes upto 3 parameters ColumnName, SortColumn and SortDecending (bool)

Excerpt from the qucik starts page

"When a data field is a foreign key of another table, Dynamic Data displays this column as a link to the other table. Dynamic Data uses the first column of type string as the link text when the relationship between the tables is a one-to-one relationship.

To change the column that is displayed as the value for the foreign key field, you must apply the DisplayColumnAttribute attribute to the partial entity class of the relationship table. You must create a partial class with the name of the table to be able to apply the attribute."

[DisplayColumnAttribute("PostalCode", "PostalCode", false)]
public partial class Customer
{
}
DisplayColumnAttribute.DisplayColumnAttribute(string displayColumn, string sortColumn, bool sortDescending) 

The above image show the fully overloaded constructor for this attribute:

  • string displayColumn - the name of the column to show when using this table in a DropDownList.
  • string sortColumn - the name of the column to sort the DropDownList by
  • bool sortDescending - set to true changes the sort to descending

So by adding this to the Customer table you can change how it is displayed in filter list and FK DropDownLists.

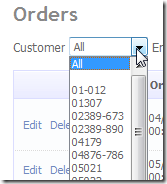
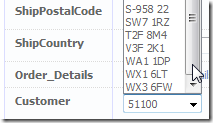
Customer Filter on Orders table Customer FK list on Orders table

Above shows the Customers filter and Customer FK drop down list on the Orders table List and Edit pages.