Monday, 21 July 2008

Dynamic Data and Field Templates - The Anatomy of a FieldTemplate

  1. The Anatomy of a FieldTemplate.
  2. Your First FieldTemplate.
  3. An Advanced FieldTemplate.
  4. A Second Advanced FieldTemplate.
  5. An Advanced FieldTemplate with a GridView.
  6. An Advanced FieldTemplate with a DetailsView.
  7. An Advanced FieldTemplate with a GridView/DetailsView Project.

Introduction

After answering a number of questions in the ASP.NET Dynamic Data forum regarding FieldTemplates I thought I write something of an introduction to them.

The Anatomy of a FieldTemplate

All FieldTemplates inherit from FieldTemplateUserControl see below which in turn inherits from UserControl, so a FieldTemplate is really just a UserControl with some extra features added via FieldTemplateUserControl.

public partial class BooleanField : System.Web.DynamicData.FieldTemplateUserControl
{
...


}

DynamicData - FieldTemplateUserControl

Figure 1 - DynamicData - FieldTemplateUserControl

The Most Immediately Useful Properties

Here are the main properties and a brief description (My own not Microsoft's :D)

FieldValue (object) – the actual value.

FieldValueString (string) – a string representing the value.

FieldValueEditString (string) - a string representing the value for edit mode.

Row (object) – the whole object in the case of an Order from the Northwind database it contain an object of type Order.

Mode (DataBoundControlMode) – values of Edit, Insert and ReadOnly.

MetaDataAttributes (AttributeCollection) – a collection of attributes for this column.

Column (MetaColumn) – the columns metadata.

Table (MetaTable) – the tables metadata.

The Most Immediately Useful Methods

void PopulateListControl(ListControl listControl) – populates a list control.

object GetColumnValue(MetaColumn column)  - gets a column values based on the MetaColumn.

The Most Immediately Useful Events

 OnDataBinding(EventArgs e) – The DataBinding event is raised when data is bound to the FieldTemplate control. This method notifies the control to perform any data-binding logic that is associated with it. When overriding OnDataBinding be sure to call the base class's OnDataBinding method so that registered delegates receive the event.

protected override void OnDataBinding(EventArgs e)
{
    base.OnDataBinding(e);

    object val = FieldValue;
    if (val != null)
        CheckBox1.Checked = (bool)val;
}

Listing 1 – OnDataBinding event from the Boolean FieldTemplate

Note: It is only during and after this event OnDataBinding the FiledValue, FieldValueString and FieldValueEditString are valid. So you can’t access them in the Page_Init or Page_Load events.

Sunday, 13 July 2008

Part 4 – A DetailsView and a GridView with seperate Validation *** UPDATED ***

As far as I can see there are three (oops! four then) types of Custom Page:

  1. Custom Pages Part 1 - Standard Custom Page based on an existing PageTemplate and customised in the DynamicData\CustomPages folder.
  2. Custom Pages Part 2 - A completely Custom Page again in the DynamicData\CustomPages folder.
  3. Custom Pages Part 3 - Standard ASP.Net Page with Dynamic Data features added to take advantage of the FieldTemplates.
  4. Custom Pages Part 4 - A DetailsView and a GridView using Validation Groups
  5. Custom Pages Part 5 - I18N? Internationalisation Custom Page

This page is a standard Edit.aspx PageTamplate with a few extra controls (GridView, LinqDataSource, DynamicValidator and ValidationSummary)

<asp:ValidationSummary 
    runat="server" 
    ID="OrdersValidationSummary" 
    EnableClientScript="true"
    ValidationGroup="Orders" 
    HeaderText="List of validation errors for Orders" />
    
<asp:DynamicValidator 
    runat="server" 
    ID="OrdersValidator" 
    ControlToValidate="dvOrders"
    ValidationGroup="Orders" 
    Display="None" />
    
<asp:DetailsView 
    runat="server" 
    ID="dvOrders" 
    DataSourceID="ldsOrders" 
    DefaultMode="Edit"
    OnItemCommand="dvOrders_ItemCommand" 
    OnItemUpdated="dvOrders_ItemUpdated" 
    CssClass="detailstable"
    FieldHeaderStyle-CssClass="bold" 
    AutoGenerateRows="True" 
    DataKeyNames="OrderID">
    <FieldHeaderStyle CssClass="bold" />
    <Fields>
        <asp:TemplateField ShowHeader="False">
            <EditItemTemplate>
                <asp:LinkButton 
                    ID="LinkButton1" 
                    runat="server" 
                    CausesValidation="True" 
                    ValidationGroup="Orders"
                    CommandName="Update" 
                    Text="Update">
                </asp:LinkButton>
                &nbsp;
                <asp:LinkButton 
                    ID="LinkButton2" 
                    runat="server" 
                    CausesValidation="False" 
                    CommandName="Cancel"
                    Text="Cancel">
                </asp:LinkButton>
            </EditItemTemplate>
        </asp:TemplateField>
    </Fields>
</asp:DetailsView>

<asp:LinqDataSource 
    runat="server" 
    ID="ldsOrders" 
    EnableUpdate="True" 
    ContextTypeName="NorthwindDataContext"
    TableName="Orders">
    <WhereParameters>
        <asp:Parameter />
    </WhereParameters>
</asp:LinqDataSource>

<br />

<asp:ValidationSummary 
    runat="server" 
    ID="Order_DetailsSummary" 
    EnableClientScript="true"
    ValidationGroup="Order_Details" 
    HeaderText="List of validation errors for Order_Details" />
    
<asp:DynamicValidator 
    runat="server" 
    ID="dyvOrder_Details" 
    ControlToValidate="gvOrder_Details"
    ValidationGroup="Order_Details" 
    Display="None" />
    
<asp:GridView 
    ID="gvOrder_Details" 
    runat="server" 
    DataKeyNames="OrderID,ProductID"
    CssClass="gridview"
    DataSourceID="ldsOrder_Details">
    <Columns>
        <asp:TemplateField ShowHeader="False">
            <EditItemTemplate>
                <asp:LinkButton 
                    ID="LinkButton1" 
                    runat="server" 
                    CausesValidation="True" 
                    ValidationGroup="Order_Details"
                    CommandName="Update" 
                    Text="Update">
                </asp:LinkButton>
                &nbsp;
                <asp:LinkButton 
                    ID="LinkButton2" 
                    runat="server" 
                    CausesValidation="False" 
                    CommandName="Cancel"
                    Text="Cancel">
                </asp:LinkButton>
            </EditItemTemplate>
            <ItemTemplate>
                <asp:LinkButton 
                    ID="LinkButton1" 
                    runat="server" 
                    CausesValidation="False" 
                    CommandName="Edit"
                    Text="Edit">
                </asp:LinkButton>
            </ItemTemplate>
        </asp:TemplateField>
    </Columns>
</asp:GridView>

<asp:LinqDataSource 
    ID="ldsOrder_Details" 
    runat="server" 
    ContextTypeName="NorthwindDataContext"
    TableName="Order_Details" 
    Where="OrderID == @OrderID" 
    EnableUpdate="True">
    <WhereParameters>
        <asp:ControlParameter 
            ControlID="dvOrders" 
            Name="OrderID" 
            PropertyName="SelectedValue"
            Type="Int32" />
    </WhereParameters>
</asp:LinqDataSource>

Listing 1 – Custom Edit page for Orders

In the above listing you can see that the validation controls and link buttons in the DetailsView and GridView have been decorated with ValidationGroup="Orders" and ValidationGroup="Order_Details" appropriately.

Note: You must set the ValidationGroup of the DetailsView/GridView data controls command buttons that update the data so that they are in the correct validation group otherwise the error will drop through the validation net and appear on the page as an un-handled exception.
Note: ValidationGroups allow you to assign validation controls on a page to a specific category. Each validation group can be validated independently of other validation groups on the page.

The problem you have with a DetailsView or GridView with AutoGenerateRows set to true is how do you set the item controls ValidationGroup.

public class ValidationGroupFieldsManager : IAutoFieldGenerator
{
    protected MetaTable _table;
    protected String _validationGroup;

    public ValidationGroupFieldsManager(MetaTable table, String validationGroup)
    {
        _table = table;
        _validationGroup = validationGroup;
    }

    public ICollection GenerateFields(Control control)
    {
        List<DynamicField> oFields = new List<DynamicField>();

        foreach (MetaColumn column in _table.Columns)
        {

            // carry on the loop at the next column  
            // if scaffold table is set to false or DenyRead
            if (!column.Scaffold)
                continue;

            // create a new field with its validation group set
            DynamicField f = new ValidationGroupDynamicField(_validationGroup);

            f.DataField = column.Name;
            oFields.Add(f);
        }
        return oFields;
    }
}

// special thanks to David Ebbo for this
public class ValidationGroupDynamicField : DynamicField
{
    protected String _validationGroup;

    public ValidationGroupDynamicField(String validationGroup)
    {
        _validationGroup = validationGroup;
    }

    public override void InitializeCell(
        DataControlFieldCell cell,
        DataControlCellType cellType,
        DataControlRowState rowState,
        int rowIndex)
    {
        if (cellType == DataControlCellType.DataCell)
        {
            var control = new DynamicControl()
                {
                    DataField = DataField,
                    // Copy various properties into the control
                    UIHint = UIHint,
                    HtmlEncode = HtmlEncode,
                    NullDisplayText = NullDisplayText,
                    // set ValidationGroup
                    ValidationGroup = _validationGroup
                };

            if ((rowState & DataControlRowState.Edit) != 0)
                control.Mode = DataBoundControlMode.Edit;

            if ((rowState & DataControlRowState.Insert) != 0)
                control.Mode = DataBoundControlMode.Insert;

            cell.Controls.Add(control);
        }
        else
        {
            base.InitializeCell(cell, cellType, rowState, rowIndex);
        }
    }
}

Listing 2 – IAutoFieldGenrator for setting the Mode and ValidationGroup

There are two classes in Listing 2 the first an example of an implementation of IAutoFieldGenrator. In this implementation all we do is create a DynamicField if there should be a column or row.

The clever bit (smile_embaressed if you can call it that) is in the my DynamicField implementation. In here we create a DynamicField and add a DynamicControl to it, set various properties including ValidationGroup (which was passed in via the constructor), then we set the Mode of the control by testing the rowState.

public partial class Edit : System.Web.UI.Page
{
    protected MetaTable mtOrders;
    protected MetaTable mtOrder_Details;

    protected void Page_Init(object sender, EventArgs e)
    {
        DynamicDataManager1.RegisterControl(dvOrders);

DynamicDataManager1.RegisterControl(gvOrder_Details);


// the following four lines were moved form Page_Load (cut and paste error on my part) mtOrders = ldsOrders.GetTable(); mtOrder_Details = ldsOrder_Details.GetTable(); dvOrders.RowsGenerator = new ValidationGroupFieldsManager(mtOrders, "Orders"); gvOrder_Details.ColumnsGenerator = new ValidationGroupFieldsManager(mtOrder_Details, "Order_Details"); } protected void Page_Load(object sender, EventArgs e) { mtOrders = ldsOrders.GetTable(); Title = mtOrders.DisplayName; } protected void dvOrders_ItemCommand(object sender, DetailsViewCommandEventArgs e) { if (e.CommandName == DataControlCommands.CancelCommandName) { Response.Redirect(mtOrders.ListActionPath); } } protected void dvOrders_ItemUpdated(object sender, DetailsViewUpdatedEventArgs e) { if (e.Exception == null || e.ExceptionHandled) { Response.Redirect(mtOrders.ListActionPath); } } }

Listing 3 – Edit.apsx.cs code behind file

In here we add the plumbing for the extra GridView and then add the RowGenrator and ColumnGenrator to the DetailsView and GridView to set the ValidationGroup for the individual fields in the both the DetailsView and GridView.

This give us the ability to have multiple DynamicData Lists, DetailsViews etc on a page and validate each one separately, which again put the validation where is should be in a central place OAOO (Once And Once Only) that I like so much smile_teeth.

Note: There appears to be a problem with the above at the moment see this thread Setting ValidationGroup on DynamicValidator and DynamicControl has... and also my post to this thread Re: How to submit and validate a dynamic data page programatically? I’m pretty sure that there will be a resolution to the problem soonsmile_teeth This was erroneous I was feeling a bit DUMB smile_embaressed but I’m better now. The issue I’m trying to fix is where you have customised the page’s columns using DynamicField which you cannot set the ValidationGroup declaratively, I’m trying to do this at runtime on the OnDataBound event. I’ll post an update when I’ve figured it out.
It would seem my Dumbness continued! It’s too late in the page creation cycle to try and set the ValidationGroup, this is because Dynamic Data uses FieldTemplates which are actually User Controls which means that they are made up of several controls. So you would have to drill down into the DynamicControl and set the ValidationGroup of each of the separate controls that make up the FieldTemplate user control. Yes you could do but it’s a lot of messing about better to just use DynamicControl over DynamicField in those situations even if the markup is more fiddly. smile_teeth

Friday, 11 July 2008

Part 3 - Standard ASP.Net Page with Dynamic Data features added to take advantage of the FieldTemplates.

As far as I can see there are three (oops! four then) types of Custom Page:

  1. Custom Pages Part 1 - Standard Custom Page based on an existing PageTemplate and customised in the DynamicData\CustomPages folder.
  2. Custom Pages Part 2 - A completely Custom Page again in the DynamicData\CustomPages folder.
  3. Custom Pages Part 3 - Standard ASP.Net Page with Dynamic Data features added to take advantage of the FieldTemplates.
  4. Custom Pages Part 4 - A DetailsView and a GridView using Validation Groups
  5. Custom Pages Part 5 - I18N? Internationalisation Custom Page

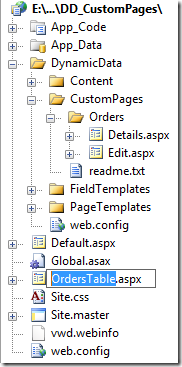
What we are going to do first is just to copy the Edit.aspx page we created in the Part 2, from the ~/DynamicData/CustomPages/Orders to the root of the site and rename it to OrderTable.aspx. (This is just to save going through everything from the previous example)

Copy and rename to OrdersTable.aspx

Figure 1 – copy and rename it to OrdersTable.aspx

To complete the rename we will need to rename the class:

<%@ Page Language="C#" AutoEventWireup="true" 
    CodeFile="OrdersTable.aspx.cs" 
    Inherits="OrdersTable" %>
Listing 1 – OrdersTable.aspx

public partial class OrdersTable : System.Web.UI.Page
{

Listing 2 – OrdersTable.aspx.cs

As you can see the Inherits and class name have been changed to OrdersTable this is just to make the class unique in the website.

Next I think more useful is a GridView rather than a DetailsView so replace the it using the instructions in the previous post (make sure you change all the dvOrders entries to gvOrders, I’m assuming you are using this naming convention for the sake of the tutorial). Set the LinqDataSource options to

Enable: Delete, Insert & Update

Figure 2 - Enable: Delete, Insert & Update

Enable: Paging, Sorting, Editing & Deleting

figure 3 - Enable: Paging, Sorting, Editing & Deleting

Now this is what we have:

<%@ Page Language="C#" AutoEventWireup="true" 
    CodeFile="OrdersTable.aspx.cs" 
    Inherits="OrdersTable" %>

<!DOCTYPE html PUBLIC "-//W3C//DTD XHTML 1.0 Transitional//EN" "http://www.w3.org/TR/xhtml1/DTD/xhtml1-transitional.dtd">
<html xmlns="http://www.w3.org/1999/xhtml">
<head runat="server">
    <title></title>
</head>
<body>
    <form id="form1" runat="server">
    <div>
        <h1>Edit Order</h1>
        <asp:ValidationSummary ID="ValidationSummary1" runat="server" EnableClientScript="true" 
HeaderText="List of validation errors" />
<asp:DynamicDataManager ID="ddmOrders" runat="server" /> <asp:DynamicValidator runat="server" ID="ddvOrders" ControlToValidate="gvOrders" Display="None"> </asp:DynamicValidator> <asp:GridView runat="server" ID="gvOrders" DataSourceID="ldsOrders" AllowPaging="True" AllowSorting="True" AutoGenerateColumns="False" DataKeyNames="OrderID"> <PagerSettings Mode="NextPreviousFirstLast" /> <Columns> <asp:CommandField ShowDeleteButton="True" ShowEditButton="True" /> <asp:DynamicField DataField="OrderID" /> <asp:DynamicField DataField="Customer" /> <asp:DynamicField DataField="Employee" /> <asp:DynamicField DataField="OrderDate" /> <asp:DynamicField DataField="RequiredDate" /> <asp:DynamicField DataField="ShippedDate" /> <asp:DynamicField DataField="Shipper" /> <asp:DynamicField DataField="Freight" /> <asp:DynamicField DataField="ShipName" /> <asp:DynamicField DataField="ShipAddress" /> <asp:DynamicField DataField="ShipCity" /> <asp:DynamicField DataField="ShipRegion" /> <asp:DynamicField DataField="ShipPostalCode" /> <asp:DynamicField DataField="ShipCountry" /> </Columns> </asp:GridView> <asp:LinqDataSource runat="server" ID="ldsOrders" ContextTypeName="NorthwindDataContext" EnableUpdate="True" TableName="Orders" EnableDelete="True" EnableInsert="True"> </asp:LinqDataSource> </div> </form> </body> </html>

Listing 3 – OrdersTable.aspx

using System;
using System.Collections.Generic;
using System.Linq;
using System.Web;
using System.Web.UI;
using System.Web.UI.WebControls;
using System.Web.DynamicData;

public partial class OrdersTable : System.Web.UI.Page
{
    // create a class level variable to hold the metatable
    protected MetaTable mtOrders;

    protected void Page_Init(object sender, EventArgs e)
    {
        // register the DetailsView with the DynamicDataManager
        ddmOrders.RegisterControl(gvOrders, true);
    }

    protected void Page_Load(object sender, EventArgs e)
    {
        // get the metatable
        mtOrders = ldsOrders.GetTable();
        Title = mtOrders.DisplayName;
    }
    protected void gvOrders_ItemUpdated(object sender, DetailsViewUpdatedEventArgs e)
    {
        // make sure the Update worked before redirecting back to Order List
        if (e.Exception == null || e.ExceptionHandled)
        {
            Response.Redirect(mtOrders.ListActionPath);
        }
    }
    protected void gvOrders_ItemCommand(object sender, DetailsViewCommandEventArgs e)
    {
        //make sure that it's the Cancel command
        if (e.CommandName == DataControlCommands.CancelCommandName)
        {
            Response.Redirect(mtOrders.ListActionPath);
        }
    }
}

Listing 4 – OrdersTable.aspx.cs (the bits with strike through no longer required, just delete them)

As you can see very little is different form the previous example in the previous post.

OrdersTable.aspc in action

Figure 4 – OrdersTable.aspc in action

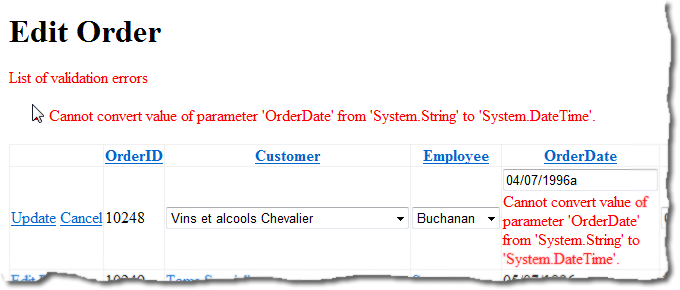
The difference come when you click Edit you get inline editing (like you get in the Listdetails.aspx page) but with all the FieldTemplates were you want them and validation also works:

Edit and validation in action

Figure 4 – Edit and validation in action

Note: It’s worth noting that at this point the page will only be accessible if you link to it via say the Default.aspx or run it directly. Because by default the RouteExistingFiles property of RouteCollection is set to false any file that exist already will not be affected by Routing. But using this kind of page will probably be used more in standard ASP.Net applications taking advantage of DynamicData.

Thursday, 10 July 2008

Part 2 - A completely Custom Page again in the DynamicData\CustomPages folder

As far as I can see there are three (oops! four then) types of Custom Page:

  1. Custom Pages Part 1 - Standard Custom Page based on an existing PageTemplate and customised in the DynamicData\CustomPages folder.
  2. Custom Pages Part 2 - A completely Custom Page again in the DynamicData\CustomPages folder.
  3. Custom Pages Part 3 - Standard ASP.Net Page with Dynamic Data features added to take advantage of the FieldTemplates.
  4. Custom Pages Part 4 - A DetailsView and a GridView using Validation Groups
  5. Custom Pages Part 5 - I18N? Internationalisation Custom Page 

Creating a Completely Custom Page

This is relatively straight forward, this page will be a no frills page just the controls no formatting etc.

  1. Create a new web forms page in the ~/DynamicData/CustomPages/Orders folder with the name Edit.aspx you don’t need to apply a master page, this page is going to be simple.
    <html xmlns="http://www.w3.org/1999/xhtml">
    <head runat="server">
        <title></title>
    </head>
    <body>
        <form id="form1" runat="server">
        <div>
        
        </div>
        </form>
    </body>
    </html>
  2. Now you have the new Edit.aspx page in the Orders folder. Add a DetailsView give it an ID of dvOrders, now add a new LinqDataSource underneath the DetailsView give it an ID of ldsOrders.
    <html xmlns="http://www.w3.org/1999/xhtml">
    <head runat="server">
        <title></title>
    </head>
    <body>
        <form id="form1" runat="server">
        <div>
            <asp:DetailsView ID="dvOrders" runat="server" Height="50px" Width="125px">
            </asp:DetailsView>
            <asp:LinqDataSource ID="ldsOrders" runat="server">
            </asp:LinqDataSource>
        </div>
        </form>
    </body>
    </html>
  3. Now Configure the LinqDataSource to look at the Orders table and enable Updating.
    <asp:LinqDataSource ID="ldsOrders" runat="server" 
        ContextTypeName="NorthwindDataContext" 
        EnableUpdate="True" 
        TableName="Orders">
    </asp:LinqDataSource>
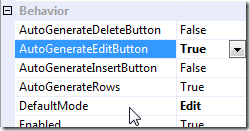
  4. Enable updating on the DetailsView and also set the DefaultMode to Edit, see below image.
    Setting DetailsView options 
    <asp:DetailsView ID="dvOrders" runat="server" 
        Height="50px" 
        Width="125px" 
        AutoGenerateEditButton="True" 
        DefaultMode="Edit">
    </asp:DetailsView>
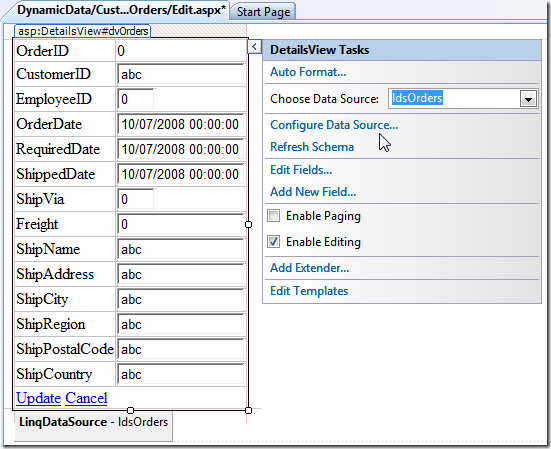
  5. Now point the DetailsView DataSource at the LinqDataSource ldsOrders and enable Editing
    Select Data Source and Enable Editing 
    You will notice that the DetailsView has now had its fields populated:
    <Fields>
        <asp:BoundField DataField="OrderID" HeaderText="OrderID" InsertVisible="False" ReadOnly="True" SortExpression="OrderID" />
        <asp:BoundField DataField="CustomerID" HeaderText="CustomerID" SortExpression="CustomerID" />
        <asp:BoundField DataField="EmployeeID" HeaderText="EmployeeID" SortExpression="EmployeeID" />
        <asp:BoundField DataField="OrderDate" HeaderText="OrderDate" SortExpression="OrderDate" />
        <asp:BoundField DataField="RequiredDate" HeaderText="RequiredDate" SortExpression="RequiredDate" />
        <asp:BoundField DataField="ShippedDate" HeaderText="ShippedDate" SortExpression="ShippedDate" />
        <asp:BoundField DataField="ShipVia" HeaderText="ShipVia" SortExpression="ShipVia" />
        <asp:BoundField DataField="Freight" HeaderText="Freight" SortExpression="Freight" />
        <asp:BoundField DataField="ShipName" HeaderText="ShipName" SortExpression="ShipName" />
        <asp:BoundField DataField="ShipAddress" HeaderText="ShipAddress" SortExpression="ShipAddress" />
        <asp:BoundField DataField="ShipCity" HeaderText="ShipCity" SortExpression="ShipCity" />
        <asp:BoundField DataField="ShipRegion" HeaderText="ShipRegion" SortExpression="ShipRegion" />
        <asp:BoundField DataField="ShipPostalCode" HeaderText="ShipPostalCode" SortExpression="ShipPostalCode" />
        <asp:BoundField DataField="ShipCountry" HeaderText="ShipCountry" SortExpression="ShipCountry" />
    </Fields>
    
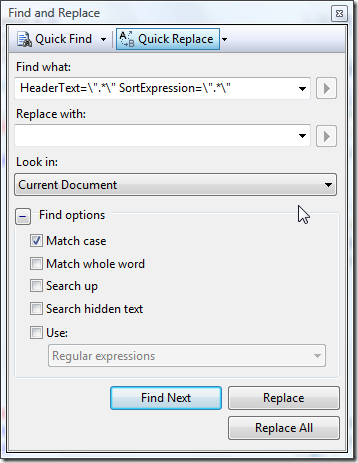
  6. We need to do a search and replace on the BoundField and replace it with DynamicField and also replace all the extra properties that are not used by DynamicField. For these fields use a Regular Expression search and replace with this string as the source:
    HeaderText=\".*\" SortExpression=\".*\" 
    Search and replace using regular expressions
  7. Now All we have to do is change the foreign key fields to EntitySet/EntityRefs, i.e. CustomerID to Customers and ShipVia to Shipper. As in the last article you can find this information in the Linq to SQL classes designer.cs file.
    <Fields>
        <asp:DynamicField DataField="OrderID" />
        <asp:DynamicField DataField="Customers" />
        <asp:DynamicField DataField="Employees" />
        <asp:DynamicField DataField="OrderDate" />
        <asp:DynamicField DataField="RequiredDate" />
        <asp:DynamicField DataField="ShippedDate" />
        <asp:DynamicField DataField="Shipper" />
        <asp:DynamicField DataField="Freight" />
        <asp:DynamicField DataField="ShipName" />
        <asp:DynamicField DataField="ShipAddress" />
        <asp:DynamicField DataField="ShipCity" />
        <asp:DynamicField DataField="ShipRegion" />
        <asp:DynamicField DataField="ShipPostalCode" />
        <asp:DynamicField DataField="ShipCountry" />
    </Fields>
  8. Now at the beginning of the page add a ValidationSummary, DynamicDataManager and DynamicValidator see below:
    <asp:ValidationSummary ID="ValidationSummary1" runat="server" EnableClientScript="true"
        HeaderText="List of validation errors" />
    <asp:DynamicDataManager ID="ddmOrders" runat="server" />
    <asp:DynamicValidator runat="server" 
        ID="ddvOrders" 
        ControlToValidate="gvOrders"
        Display="None">
    </asp:DynamicValidator>
  9. In the code behind add the following:
    using System;
    using System.Collections.Generic;
    using System.Linq;
    using System.Web;
    using System.Web.UI;
    using System.Web.UI.WebControls;
    // remember to add this using
    using System.Web.DynamicData;
    public partial class DynamicData_CustomPages_Orders_Edit : System.Web.UI.Page { // create a class level variable to hold the metatable protected MetaTable mtOrders; protected void Page_Init(object sender, EventArgs e) { // register the DetailsView with the DynamicDataManager ddmOrders.RegisterControl(dvOrders, true); } protected void Page_Load(object sender, EventArgs e) { // get the metatable mtOrders = ldsOrders.GetTable();
    // add title to page


    Title = “Orders”; } protected void dvOrders_ItemUpdated(object sender, DetailsViewUpdatedEventArgs e) { // make sure the Update worked before redirecting back to Order List if (e.Exception == null || e.ExceptionHandled) { Response.Redirect(mtOrders.ListActionPath); } } protected void dvOrders_ItemCommand(object sender, DetailsViewCommandEventArgs e) { //make sure that it's the Cancel command if (e.CommandName == DataControlCommands.CancelCommandName) { Response.Redirect(mtOrders.ListActionPath); } } }
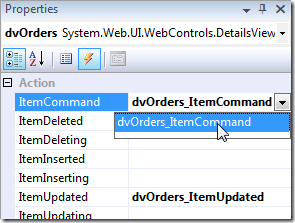
  10. Now select the event handlers for the DetailsView from it’s properties.
    Selecting the event handlers 
  11. Oh and pop a title in at the top of the page
    <h1>Edit Order</h1>

And that's the bare minimum custom page, next the standard ASP.Net page using DynmaicData.

Wednesday, 9 July 2008

Part 1 - Standard Custom Page Dynamic Data and Custom Pages

As far as I can see there are three (oops! four then) types of Custom Page:

  1. Custom Pages Part 1 - Standard Custom Page based on an existing PageTemplate and customised in the DynamicData\CustomPages folder.
  2. Custom Pages Part 2 - A completely Custom Page again in the DynamicData\CustomPages folder.
  3. Custom Pages Part 3 - Standard ASP.Net Page with Dynamic Data features added to take advantage of the FieldTemplates.
  4. Custom Pages Part 4 - A DetailsView and a GridView using Validation Groups
  5. Custom Pages Part 5 - I18N? Internationalisation Custom Page  

Creating a Standard Custom Page

To customise a standard PageTemplate all you do is create a folder with the name of the entity collection (e.g. Order entity would have the folder Orders).
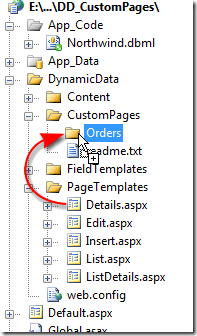
 Copy PageTemplate to CustomPages folder

Figure 1 – Copy PageTemplate to CustomPages folder

All you do then is copy the PageTemplate you want to modify to the CustomPages sub-folder.

 Copying Details.aspx to the CustomPages <TableName>folder

Figure 2 - Copying Details.aspx to the CustomPages <TableName>folder

Customising the Standard Custom Page

For out first step we will wire up the LinqDataSource to the Orders Table/Entity set, this will cause the column of the DetailsView to be updated see below.

<Fields>
    <asp:BoundField DataField="OrderID" HeaderText="OrderID" InsertVisible="False" ReadOnly="True" SortExpression="OrderID" />
    <asp:BoundField DataField="CustomerID" HeaderText="CustomerID" SortExpression="CustomerID" />
    <asp:BoundField DataField="EmployeeID" HeaderText="EmployeeID" SortExpression="EmployeeID" />
    ...
<asp:BoundField DataField="ShipPostalCode" HeaderText="ShipPostalCode" SortExpression="ShipPostalCode" /> <asp:BoundField DataField="ShipCountry" HeaderText="ShipCountry" SortExpression="ShipCountry" /> </Fields>

Listing 1 – Columns collection from the Details.aspx

Now to edit his to take advantage of DynamicData:

<Fields>
    <asp:DynamicField DataField="OrderID" />
    <asp:DynamicField DataField="Customer" />
    <asp:DynamicField DataField="Employee" />
    ...
<asp:DynamicField DataField="ShipPostalCode" /> <asp:DynamicField DataField="ShipCountry" /> </Fields>

Listing 2 – Updated columns collection from the Details.aspx

Here what I did was search and replace BoundField with DynamicField and remove all other unneeded properties (I used regular expressions to remove the extra fields here is the expression HeaderText=\".*\" SortExpression=\".*\" and replaced with an empty string), (these should come from the metadata from the column) then rearrange the order and replace the columns I didn’t want displaying with columns that I did (i.e. ShipVia with Shipper, CustomerID with Customer, etc) you can find the names of the EntitySet and EntityRef in the designer.cs/designer.vb file under the dbml file of your LinqToSql classes just drop the ‘_’ underscore at the beginning (you will see the actual property for each later on but this bit at the beginning always gets me what I want).

private EntitySet<Order_Detail> _Order_Details;
private EntityRef<Customer> _Customer;
private EntityRef<Employee> _Employee;
private EntityRef<Shipper> _Shipper;

Listing 3 – from Northwind.designer.cs file

If we run the DynamicData website now we will get what seems similar to the default Details.aspx page, but missing the Edit and Delete links.

Now whart we need is to add Edit and Delete functionality again.

<asp:TemplateField>
    <ItemTemplate>
        <asp:HyperLink ID="EditHyperLink" runat="server"
            NavigateUrl='<%# table.GetActionPath(PageAction.Edit, GetDataItem()) %>'
            Text="Edit" />
        <asp:LinkButton ID="DeleteLinkButton" runat="server" CommandName="Delete" CausesValidation="false"
            OnClientClick='return confirm("Are you sure you want to delete this item?");'
            Text="Delete" />
    </ItemTemplate>
</asp:TemplateField>

Listing 4 – copied from the original List.aspx

Here I’ve copied and pasted the TemplateField from the original List.aspx page to get the same functionality for Edit, Details and Delete.

Adding Master Details page funtionality

Now we add a GridView and LinqDataSource to the page for the Order_Details, (which all I did was copy the one from the List.aspx PageTemplate and then edit it).

<asp:GridView ID="GridView1" runat="server" DataSourceID="GridDataSource"
    AllowPaging="True" AllowSorting="True" CssClass="gridview">
    <Columns>
        <asp:TemplateField>
            <ItemTemplate>
                <asp:HyperLink ID="EditHyperLink" runat="server"
                    NavigateUrl='<%# table.GetActionPath(PageAction.Edit, GetDataItem()) %>'
                Text="Edit" />&nbsp;<asp:LinkButton ID="DeleteLinkButton" runat="server" CommandName="Delete"
                    CausesValidation="false" Text="Delete"
                    OnClientClick='return confirm("Are you sure you want to delete this item?");'
                />&nbsp;<asp:HyperLink ID="DetailsHyperLink" runat="server"
                    NavigateUrl='<%# table.GetActionPath(PageAction.Details, GetDataItem()) %>'
                    Text="Details" />
            </ItemTemplate>
        </asp:TemplateField>
    </Columns>

    <PagerStyle CssClass="footer"/>        
    <PagerTemplate>
        <asp:GridViewPager runat="server" />
    </PagerTemplate>
    <EmptyDataTemplate>
        There are currently no items in this table.
    </EmptyDataTemplate>
</asp:GridView>

<asp:LinqDataSource ID="GridDataSource" runat="server" EnableDelete="true">
    <WhereParameters>
        <asp:DynamicControlParameter ControlID="FilterRepeater" />
    </WhereParameters>
</asp:LinqDataSource>
<br />

Listing 5 – Extra GridView and LinqDataSource which I copied from the List.aspx PageTemplate

Linking the two GridViews together is done in the customising of the LinqDataSource switch to design view of the Details.aspx page and find the new LinqDataSource and click on the tasks button:
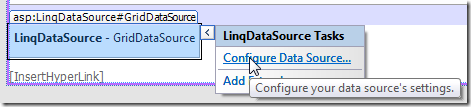
LinqDataSource Tasks

Figure 3 – Configuring the LinqDataSource

Follow the wizard through and select Order_Details as the source table and then click on the Where button. Then configure the where expression to limit the list to the record in the DetailsView.
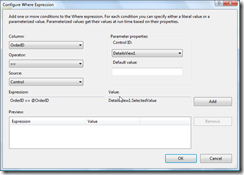
Configure the where expression

Figure 4 - Configure the where expression

Say yes to updating the GridViews column when asked. Then edit the GridView’s columns collection the same way we did the DetailsView’s fileds collection, edit the columns so that any EntitySets/EntityRefs are shown instead of their foreign keys.

Now if we run the app and choose Orders and then Details we will see something like this:
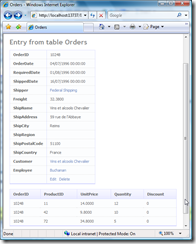
Order Details page with Order_Details at the bottom

Figure 5 – Output from our custom Details.aspx page

Note: I’ve left the OrderID in both the DetailsView and the GridView just to show that we are getting the correct records, you can remove them once you are happy that that is happening.

We need to ad a new class level variable:

protected MetaTable table1;

Then the Page_Init must updated:

protected void Page_Init(object sender, EventArgs e)
{
    DynamicDataManager1.RegisterControl(DetailsView1, true);
    DynamicDataManager1.RegisterControl(GridView1, false);
}

Listing 6 – Updated Page_Init

Also in the Page_Load event handler add the following line right after one for that default table so that its metadata for the second table can be referenced:

table1 = GridDataSource.GetTable();

and then in the NavigateUrl declaration change table to table1

Note: Creating table1 and assigning it through GridDataSource.GetTable() give us a reference to the GridView’s table. Which then allows us to get the correct URL from table1.GetActionPath(PageAction.Edit, GetDataItem())

We need to put the edit capability back into the GridView to do this all we have to do is copy them from the List.aspx PageTemplate and then add them to the beginning of the Columns collection:

<asp:TemplateField>
    <ItemTemplate>
        <asp:HyperLink ID="EditHyperLink" runat="server"
            NavigateUrl='<%# table1.GetActionPath(PageAction.Edit, GetDataItem()) %>'
        Text="Edit" />&nbsp;<asp:LinkButton ID="DeleteLinkButton" runat="server" CommandName="Delete"
            CausesValidation="false" Text="Delete"
            OnClientClick='return confirm("Are you sure you want to delete this item?");'
        />&nbsp;<asp:HyperLink ID="DetailsHyperLink" runat="server"
            NavigateUrl='<%# table1.GetActionPath(PageAction.Details, GetDataItem()) %>'
            Text="Details" />
    </ItemTemplate>
</asp:TemplateField>

Listing 6 – Adding the Edit, Delete and Details functionality

As you can see from running the app again the Edit, Delete and Details functionality is back.
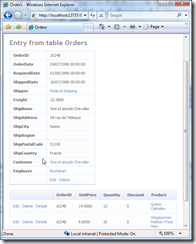
With Edit, Delete and Details functionality

Figure 6 – With Edit, Delete and Details functionality

And we finish off by adding paging to the DetailsView

<asp:DetailsView ID="DetailsView1" runat="server" DataSourceID="DetailsDataSource"
    OnItemDeleted="DetailsView1_ItemDeleted" CssClass="detailstable" FieldHeaderStyle-CssClass="bold"
    AutoGenerateRows="False" DataKeyNames="OrderID" AllowPaging="True">
    <PagerSettings Mode="NextPreviousFirstLast" />

Listing 7 – Adding paging to the DetailsView

I think that will do for this part of the series, we can add other features to the page in the next edition.